If you are searching for Top Selenium Interview Questions and Answers for 2023, then you are at right place. In this super helpful list of Java based Selenium Interview Questions and Answers, we will learn about a variety of Selenium Interview Questions and Answers, that will not only help you during your Automation Testing Interview / SDET Technical Round Interview’s Questions Answers, but also increase your learning curve.
We will also share, which Selenium Interview Question has been asked by which Tech Company (such as – Google, Microsoft, Global Logic etc.), so that you can get some idea about the level of difficulty of Interview Questions. So, Let’s get started –
Selenium Interview Questions and Answers – For Freshers 🔺
In this section, we will focus on little simple and basic Selenium Interview Questions, which can be asked from freshers as well as experienced candidates. So let’s get started from the very first question –

Q1) What is Selenium Framework? Or, What is Selenium Library?
Answer-
When the interviewer asks this question, just tell him/her about Selenium Framework using below 5 points –
- Selenium is a suite of projects / libraries used to automate web browsers.
- Selenium is freely available to use. It’s an open source library.
- Selenium supports automation of all the major browsers (eg. Chrome, Firefox, Safari, Edge, etc.) using different programming languages (eg. Java, Python etc.)
- We can start writing test script with Selenium library and any one of these programming languages – Java, Python, CSharp, JavaScript, Ruby, Kotlin etc.
- Selenium is a light-weight UI Automation Library.
Learn more from here –
Q2) What is Selenium Framework? What are different types of Selenium tools available?
Answer –
Remember friends, this is also being asked as – “What are the Selenium suite components?“
What is a Framework ?
A Framework defines a set of roles or best practices, which we can follow in a systematic way to achieve the desired results. There are different types of Automation Frameworks and the most common ones are:
- Data Driven Framework,
- Keyword Driven Framework,
- Hybrid Testing Framework.
- Behaviour Driven Development Framework.
What is a Selenium Tools ?
The Selenium Project is basically a suite of Frameworks or Tools. You can give answer your Interviewer using below table-
Till today, we have 3 types of Selenium Framework available for different different purposes –
| #No. | Selenium Framework Tools | Basic Usage of Tool |
| #1. | Selenium WebDriver | Used for Website automation and Web application automation. |
| #2. | Selenium IDE | It is available in form of browser extensions (Chrome and Firefox extension). It records browser actions and plays it again and again. |
| #3. | Selenium Grid | Used for running test cases / selenium scripts in different machines (Computers, Smart phones) across different platforms (macOS, Linux, Windows, Android, iOS) on multiple browsers (Chrome, Firefox, Safari, etc). |
Learn more from here –
Q3) What is Test Automation or Automation Testing?
Answer –
Test Automation is made up of 2 words = Test + Automation. Here, Test refers to Testing the applications functionality, and Automation refers to a process where we write code to automate the process of Testing the applications functionality.
Automation Testing or Test Automation is basically a process of automating the manual testing process of an application by using testing tools that allow you to create test code scripts that can be executed repeatedly, generating detailed test reports of the application or system under test.
Automation testing helps to reduce the time, cost, and effort required to test any software applications by automating repetitive tasks and allowing testers to focus on more critical test cases.
Q4) What are the advantages of using Selenium as an automation tool?
Answer –
The above Selenium Interview Questions is also get asked as – Why have you decided to use the Selenium for your Testing Framework? OR “Why should Selenium be selected as a testing tool for web applications or systems?“. So, you need to provide below answer to your interviewer.
Selenium has many advantages –
- Free and Accessible to all:
Selenium is a free tool that anyone can download and use. It’s available to everyone, and you don’t have to pay for it. Plus, there’s a helpful community to assist if you have questions. - Works with Multiple Languages:
Selenium can understand and work with different languages like Java, Perl, Python, C#, Ruby, Groovy, JavaScript, and a few others. So, it’s flexible and can be used with almost any Programming Language you’re comfortable with. - Works on Different Computers / Operating Systems:
You can create your tests on one computer (like Windows) and can execute them on another (like Linux / mac) without any problems. - Compatible with Various Web Browsers:
Selenium can test websites on different web browsers like Chrome, Firefox, Edge and Opera. This helps to make sure that a website or web application works well for everyone. - Supports Different Tools:
Selenium can be combined with other development and testing tools and frameworks, like ANT, Maven, and TestNG. This helps in building and testing software more efficiently. - Works on Mobile Devices:
Selenium can also be used to test websites on phones like Android and iPhone, which is important for mobile app testing and responsiveness testing. - Keeps Getting Better:
Since millions of people are using Selenium nowadays, so it gets updated regularly. You can easily update it without needing special training, and it doesn’t cost extra money. - Comes as a Suite:
Selenium isn’t just one tool; it’s a collection of many useful tools for different testing needs. Each tool does specific tasks, and together they form a powerful testing suite. Along with Selenium WebDriver, the Selenium suite also includes tools such as Selenium IDE, Selenium Grid. One of it’s tools has been deprecated recently – Selenium Remote Control (RC). - Easy to Use:
Selenium has a user-friendly testing framework, making it easy for testers to create and run tests.
In short, Selenium is a free and flexible tool that works on various computers and browsers. It’s easy to use and keeps improving, making it a valuable choice for automated testing.
To Learn In Detail About This Selenium Interview Questions, Click Here –
Q5) What are the disadvantages of using Selenium as a testing tool?
There are a couple of disadvantages with Selenium –
- Limited to Web Applications:
Selenium can only support to test websites and web-based applications. It can’t test mobile apps, image or icon matching, and things like Captcha puzzles, or Barcode readers by itself. You need extra tools like Appium, Sikuli or TestNG for that. - No Built-in Reporting:
Selenium doesn’t have its own way of creating test reports. You have to rely on other tools like TestNG or JUnit to make proper reports about your passed test cases and failed test cases. - No Dedicated Tech Support:
Since Selenium is free and open-source, there’s no dedicated team to help you if you run into problems. You have to rely on the community, forums, stack overflow or figure things out on your own. - Requires Programming Knowledge:
To use Selenium effectively, you need to know some programming / scripting language. It’s not as user-friendly as some other testing tools, so you must have to be comfortable with writing code to write the Test Cases using Selenium WebDriver.
To Learn More, Click Here –
Q6) What is Locator in Selenium?
Answer –
There are many Web Elements (such as Input Box, Buttons, Links, Paragraphs etc) on almost each & every web page. And if we want to find a particular web element among them, then a Locator helps us to find them uniquely. Using Locators, we can also find multiple web elements as per the requirement. There are multiple locators available in Selenium to find one / multiple web elements of web page –
| ID | TagName |
| ClassName | Xpath |
| LinkText | PartialLinkText |
| CSS Selector | Name |
To Learn More, Click Here –
Q7) Write a Selenium Test Script to find a table element with id=’student-records’?
Answer –
Certainly! Here’s an example of a Selenium test script written in Java to find a table element with the id ‘student-records’ on a web page using the Selenium WebDriver. Before running this script, make sure you have the Selenium WebDriver set up in your Java project.
package com.logicalduniya.selenium.interview.questions;

import org.openqa.selenium.By;
import org.openqa.selenium.WebDriver;
import org.openqa.selenium.WebElement;
import org.openqa.selenium.chrome.ChromeDriver;

public class SeleniumInterviewTest {

    public static void main(String[] args) {

        // First Set the path to the ChromeDriver executable file -
        System.setProperty("webdriver.chrome.driver", "path/to/chromeDriverBinaryFile");

		// Set the basics parameter of ChromeDriver -
		ChromeOptions chromeOptions = new ChromeOptions();
		chromeOptions.addArguments("start-maximized"); 			// Open Browser in maximized mode
		chromeOptions.addArguments("disable-infobars"); 		// Disabling infobars
		chromeOptions.addArguments("--ignore-certificate-errors");
		chromeOptions.addArguments("--remote-allow-origins=*");
		chromeOptions.setAcceptInsecureCerts(true);				// AcceptInsecureCerts

        // Initialize the WebDriver (in this example, we're using Chrome)
        WebDriver driver = new ChromeDriver();

        // Navigate to the web page where the table element is located
        driver.get("https://example.com");  // Replace with the actual URL of the web page

        try {
            // Find the table element by its id attribute
            WebElement tableElement = driver.findElement(By.id("student-records"));

            // Do something with the table element (e.g., print its text)
            System.out.println("Table Text:");
            System.out.println(tableElement.getText());

        } catch (Exception e) {
            e.printStackTrace();
        } finally {
            // Close the WebDriver session
            driver.quit();
        }
    }
}
Explanation of above Selenium + Java Based Test Script:
- We import the necessary Selenium classes and create a WebDriver instance (ChromeDriver in this case). Ensure you replace
"path/to/chromedriver.exe"with the actual path to the ChromeDriver executable. - We navigate to the web page where the ‘student-records’ table is expected to be by using
driver.get("https://example.com"). - Inside a try-catch block, we attempt to find the table element using
driver.findElement(By.id("student-records")). This line of code locates the table element by its ‘id’ attribute. - If the table element is found, you can perform various actions on it. In this example, we simply print the text of the table.
- If there’s an exception (for example, if the element is not found), the script will print a stack trace.
- Finally, we close the WebDriver session using
driver.quit()to clean up resources.
Remember to replace "https://example.com" with the actual URL of the web page you want to test, and make sure you have the appropriate WebDriver executable (e.g., chromedriver.exe for Chrome) set up and referenced in your project.
To Learn More – Click Here :
Q8) How to handle Frames in Selenium?
Answer –
Each frame or iframe is like a separate HTML document embedded within the main page. So, to interact with elements inside a frame or iframe, you need to switch the WebDriver’s focus to that particular frame or iframe. The driver.switchTo().frame(..) method is used for this purpose.
There might be situations, where we might want to switch the WebDriver’s focus back to the main content of the page from within a frame. So, in that case driver.switchTo().defaultContent() method comes into picture.
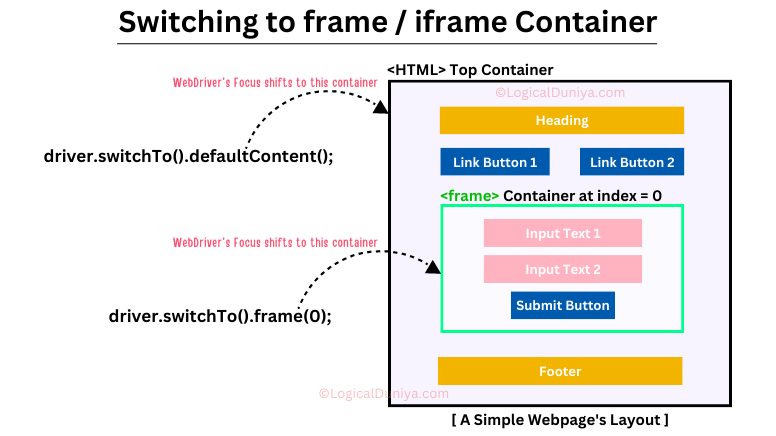
In frame() method, we need to pass either Index (in integer data type), or frame ID ( as String) or frame Name (as String). So, the 2 code statements, that help us to handle Frames in Selenium are –
driver.switchTo().defaultContent();

driver.switchTo().frame(...);     // Here, in place of (...) you can put either Index (int), or frame ID (String) or frame Name (String)
To Learn More About This Selenium Interview Questions, Click Here –
Q9) Which HTML web elements need to be taken care while working with frames?
Answers-
Each frame or iframe HTML web element acts like a separate HTML document embedded within the main web page. So, to interact with elements inside a frame or iframe HTML web element, we need to switch the WebDriver’s focus to that particular frame or iframe.
The driver.switchTo().frame(..) method is used for switching to frames.
To Learn more, Click here –
Q10) What are some of the Exceptions that you face during Selenium automation?
Answer –
During execution of Selenium scripts, due to different different reasons, we get different types of Selenium Exceptions, such as –
<code>NoSuchElementException:
When the process of locating the elements of interest in the web page fails, Selenium throws aNoSuchElementException.NoSuchWindowException:
When the process of finding a browser windows with it’s id results to a failures, Selenium throws a<code>NoSuchWindowException.
Other exceptions are –NoSuchFrameExceptionNoAlertPresentExceptionInvalidSelectorExceptionElementNotVisibleExceptionElementNotSelectableExceptionTimeoutExceptionNoSuchSessionExceptionStaleElementReferenceException
To Learn more, Click here –
Q11) What do you know about ‘StaleElementReferenceException’ in Selenium?
Answer –
StaleElementReferenceException is a common exception in Selenium that occurs when you try to interact with a web element that is no longer attached to the DOM (Document Object Model) of the web page. This exception mostly happens in dynamic web applications where elements on the page change without a page refresh such as due to AJAX (Asynchronous JavaScript And XML).
To illustrate how StaleElementReferenceException can occur, an example can be like :
Suppose you have a web page with a button ‘Load More’, and you want to click it using Selenium:
WebElement button = driver.findElement(By.id("loadMore"));  // Assume, the 'id' attribute of the button contains 'loadMore'
button.click();
However, if the web page’s JavaScript code updates the DOM, for example, by removing the button and adding a new one with the same ID, and You attempt to click that button again using the previously located button element, then it will result in a StaleElementReferenceException.
This exception occurred because the original button element is no longer part of the DOM, and Selenium cannot interact with it.
To Learn more, Click here –
Q12) What is wait in Selenium? What are different types of waits in Selenium?
Answer –
Most of the time, when you will try to look for an element on a web page, it will not be available due to different reasons such as slow page loading issue, element not visible issue. In that case, your script will throw exception and it will get fail. To handle this scenario, we need to tell our Selenium script to wait for some time, until the element gets visible or the time gets over.
There are two better approach to handle waiting time –
- Implicit wait strategies.
1.a) Implicit Wait Timeout.
1.b) Page Load Timeout.
1.c) Script Timeout. - Explicit wait strategies.
2.a) FluentWait.
2.b) WebDriverWait.
| Summary | Details |
|---|---|
| Implicit Wait Timeout | driver.manage().timeouts().ImplicitlyWait(Duration.ofSeconds(30));// Go to web page .. |
| Page Load Timeout | driver.manage().timeouts().setPageLoadTimeout(Duration.ofSeconds(30));// Go to web page .. |
| Script Timeout | driver.manage().timeouts().setScriptTimeout(Duration.ofSeconds(30));// Go to web page .. |
| FluentWait | // Declare and initialise a FluentWait objectFluentWait wait = new FluentWait(driver);// Specify the timeout of the wait wait.withTimeout(5000, Duration.ofSeconds(10)); // Specify polling time wait.pollingEvery(250, TimeUnit.MILLISECONDS);// Specify what exceptions to ignore wait.ignoring(NoSuchElementException.class)// This is how we specify the condition to wait on. wait.until(ExpectedConditions.alertIsPresent()); |
| WebDriverWait | // Declare the WebDriverWait object with timeout duration in millisecondsWebDriverWait waiter = new WebDriverWait(driver, 5000); // Provide the Expected Condition to check – waiter.until( ExpectedConditions.presenceOfElementLocated(by) ); driver.findElement(by); |
To Learn more about such Selenium Interview Questions, Click here –
Q13) How to perform mouseover in Selenium WebDriver using Java?
Answer –
The most efficient solution to perform mouseover function in Selenium and Java is using the moveToElement(..) method of Actions class.
As, its not really possible to perform a ‘mouse hover’ action, instead we need to chain all of the actions that we want to achieve in one go. So first we need to move to the element that reveals the others, then during the same chain, move to the now revealed element and click on it.
You can think of it similar to ‘do it like a user would’ process. Let’s say, on web page, we have a ‘Hover Me’ button, and when we hover over it, and see all its sub-menus, so the coding solution would be like –
Actions action = new Actions(webdriverObject);
WebElement button = webdriverObject.findElement(By.xpath("//button[text()='Hover Me']"));
action.moveToElement(button)
      .moveToElement(webdriverObject.findElement(By.xpath("/expression-here")))
      .perform();
To Learn More About This Selenium Interview Questions, Click Here –
Q14) What is XPath in Selenium? Explain Absolute XPath and Relative XPath?
Answer –
XPath is also known as XML-Path or Extensible Markup Language Path. It is a language used to query XML documents. XPath provides multiple ways to locate elements by iterating through each element in a webpage.
You know, behind the user interface, every webpage is an XML document. So, to access web elements, we take help of XPath.
In Selenium, XPath is used as an locator to locate web elements (buttons, links etc.) on any web page. In Selenium automation, if the elements are not found by the most general locators such as id, name, class, etc. then XPath is used to find an element on the web page. To write a general XML Path expression, follow below syntax –
//tagname[@attribute='value']
As you can see, in any XPath expression, data is stored in a key-value pair format similar to an HTML tag. It uses a single slash, i.e. double slash, i.e. ‘ // ’ for creating a relative path and a ‘ / ’ for creating an absolute path, for an element to be located on a webpage.
To Learn more, Click here –
Q15) What are different ways to go to a URL in Selenium?
Answer –
In Selenium, we have multiple ways to go to a URL –
1. driver.get("https://logicalduniya.com/selenium");

2. driver.navigate().to("https://logicalduniya.com/selenium");
To Learn more, Click here –
Q16) What is the difference between driver.get() and driver.navigate()?
Answer –
This Selenium Interview Question can also be asked as :
- What are different ways to go to a web URL?
In Selenium, if you want to launch a web URL, then you have basically 2 ways –
driver.get("link-to-webpage")driver.navigate().to("link-to-webpage")
Both the methods driver.get() and driver.navigate().to() work in a similar way, but with navigate() method we can also move backwards and forwards in your browser’s history.
The methods to move forward and backward as per the browser’s history are –
driver.navigate().forward();driver.navigate().back();
To Learn more, Click here –
- RelatedPost
Q17) What are the limitations of Selenium Framework ?
Answer –
This question can also be asked as –
- What are the drawbacks of Selenium Framework?
- What are limitations of Selenium Library?
To answer this question, you need to tell below points –
There are multiple limitations or drawbacks if we choose Selenium as a Testing Framework –
1) Zero support for Reporting :
In Selenium, there is no support to generate reports that shows – How many test cases passed? How many failed? How many skipped? etc. To generate detailed and understandable report we need to use third party tools / plugins / dependencies, such as : TestNG, ReportPortal or any other similar.
2) Limited support to test Desktop based applications :
Selenium majorly supports testing of web applications and it does not support automating desktop applications. To work with Desktop based applications automation, we need to use third-party tools / plugins such as – AutoIt or Sikuli for desktop automation. However it is observed that these do not integrate seamlessly with Selenium Framework.
3) Limited Support for CAPTCHA:
Selenium struggles with CAPTCHA. CAPTCHA stands for – Completely Automated Public Turing test to tell Computers and Humans Apart. CAPTCHAs are specifically designed to block automated scripts.
4) Learning Curve:
Selenium has a relatively difficult learning curve, especially for beginners with no prior automation experience. It requires a good understanding of a programming language, HTML/CSS and little bit of JavaScript in order to write Selenium automation scripts.
5) Performance Issues:
When running a large suite of tests or complex scenarios, the performance of Selenium scripts may go down. And, performance improvements of any Selenium based Test Framework requires a considerable amount of effort.
Other limitations of Selenium Framework are –
6. Lack of Built-in Data-Driven Testing
7. No Support for Testing Non-Web Applications
8. Maintenance Effort
9. Facing difficulties during handling dynamic content
10. Cross-browser Testing Challenges
To Learn more, Click here –
Q18) How to fix Stale Element Exception in Selenium?
Answer –
First let’s try to understand, why does StaleElementReferenceException occurs ?
StaleElementReferenceException is a little weird exception in Selenium that occurs when you try to interact with a web element that is no longer attached to the DOM (Document Object Model) of the web page. This exception typically happens in dynamic web applications where elements on the page change without a page refresh.
Here’s an example to illustrate how StaleElementReferenceException can occur:
Suppose you have a web page with a ‘Load More’ button, and you want to click it using Selenium WebDriver, so you might try with :
WebElement button = driver.findElement(By.id("loadMoreButton"));  // Let's say, the button element's id = "loadMoreButton"
button.click();  // This might throw StaleElementReferenceException
In this case, If that web page’s JavaScript code updates the DOM, for example, by removing the button and adding a new one with the same ID attribute, then if you attempt to click the button WebElement again using the previously located button element, it will result in a StaleElementReferenceException. This is because the original button element is no longer part of the DOM, and Selenium cannot interact with it.
Now, Let’s try to understand, How to handle the StaleElementReferenceException ?
To handle StaleElementReferenceException, you should re-locate the element before interacting with it. Here’s an updated example:
WebElement button = null;
try{
  button = driver.findElement(By.id("loadMoreButton"));  // Assuming, button's id = 'loadMoreButton'

  // Page content changes, which will cause a StaleElementReferenceException during click..

  // Click the button
  button.click();

} catch(StaleElementReferenceException e) {
  // Re-locate the button element
  button = driver.findElement(By.id("loadMoreButton"));

  // Click the button again
  button.click();
}
In this example, we re-locate the button element after the page content changes to avoid the StaleElementReferenceException. This ensures that you are interacting with the most up-to-date element in the DOM.
So, the StaleElementReferenceException occurs when you try to interact with a web element that has become detached from the DOM due to dynamic changes on the web page. To avoid this exception during Selenium script execution, we should always re-locate the element before performing any actions on it after page updates.
To Learn more, Click here –
Q19) What are the different types of annotations which are used in Selenium?
Answer –
This Selenium Interview Question can also be asked as –
- What annotations can we use in Selenium scripts?
- What are annotations in QA Testing with Selenium?
- What are TestNG annotations?
You can answer like –
Selenium framework does not provide any annotations as of today till Selenium v4.
However, we can use TestNG along with Selenium, and the TestNG allows us to use its different annotations to run Test Cases, Make dependency among Test Cases, Execute parallel tests, mark a Test case to run before some other Test Case, and more.
TestNG provides you full control over the test cases and the execution of the test cases. Due to this reason, TestNG is also known as a Testing Framework.
Some of its main annotations are –
@Test– This annotation is used to mark a method as a test method.@BeforeMethod– This annotation is used to execute a method before each test method.@AfterMethod– This annotation is used to execute a method after each test method.@BeforeClass– This annotation is used to execute a method before executing the first test method.@AfterClass– This annotation is used to execute a method after executing the last test method.
Other annotations are –
@BeforeSuite , @AfterSuite , @BeforeTest , @AfterTest , @BeforeTest , @AfterTest
To Learn More About This Selenium Interview Questions, Click Here –
Q20) What is the difference between driver.close() and driver.quit()?
Answer –
close() – It is used to close the browser or web page currently which is having the focus.
quit() – It is used to shut down the web driver instance or destroy the web driver instance (which eventually closes all the windows of the browser).
To Learn more, Click here –
Q21) Why is Selenium a popular framework for automation testing?
Answer –
Selenium has many advantages –
- Free and Accessible to all:
Selenium is a free tool that anyone can download and use. It’s available to everyone, and you don’t have to pay for it. Plus, there’s a helpful community to assist if you have questions. - Works with Multiple Languages:
Selenium can understand and work with different languages like Java, Perl, Python, C#, Ruby, Groovy, JavaScript, and a few others. So, it’s flexible and can be used with almost any Programming Language you’re comfortable with. - Works on Different Computers / Operating Systems:
You can create your tests on one computer (like Windows) and can execute them on another (like Linux / mac) without any problems. - Compatible with Various Web Browsers:
Selenium can test websites on different web browsers like Chrome, Firefox, Edge and Opera. This helps to make sure that a website or web application works well for everyone. - Supports Different Tools:
Selenium can be combined with other development and testing tools and frameworks, like ANT, Maven, and TestNG. This helps in building and testing software more efficiently. - Easy to Use:
Selenium has a user-friendly testing framework, making it easy for testers to create and run tests.
In short, Selenium is a free and flexible tool that works on various computers and browsers. It’s easy to use and keeps improving, making it a valuable choice for automated testing. And, that is the reason of Selenium frameworks popularity.
To Learn more, Click here –
Q22) What is an Exception Test in Selenium?
Answer –
When using TestNG with Selenium, we have the ability to grab exceptions with annotations, which might occur when a test case is running.
In TestNG, we make use of expectedException attribute within a @Test annotation and then, we need to specify the type of exceptions that are expected to be thrown when executing that test method.
So, in below example, that particular Test method dividedByZeroTest() is called as Exception Test, which contains an expectedExceptions attribute.
Example :
@Test( expectedExceptions = ArithmeticException.class )
public void dividedByZeroTest(){
	// some code ...
	int num = 1/0;		// This statement will throw - ArithmeticException
	// some code ...
}
To Learn More About This Selenium Interview Question, Click here –
Q23) How can we type text in a TextBox using Selenium?
Answer –
To type text in a TextBox WebElement using Selenium,
First step – We need to locate the target TextBox input element using any of the locating strategies (id / class / xpath etc.) in Selenium, and
Second step – Then, We need to use the sendKeys("...") method to enter text into the TextBox.
Example –
// Step 1- Find the Input Box to input the Sentence -
WebElement inputTextBox = driver.findElement(By.xpath("//input[@id='text-email']"));

// Step 2- Input the Sentence -
inputTextBox.clear();
inputTextBox.sendKeys( sentence );
To Learn more, Click here –
Q24) How can we move to the nth-child element using XPath?
Answer –
We can move to the nth-child element using XPath by using the following XPath expression:
(//parent-element/*)[n]To Learn more, Click here –
Q25) What is Locator in Selenium?
Answer –
- Locators are used to identify and locate elements on a web page for test automation in Selenium.
- Locators define the strategy or mechanism by which Selenium finds and interacts with specific elements on the page.
- As of now, there are overall 8 Locators available in Selenium, using which we can try to identify any web element on the web page.
- In Selenium, some locators work with some specific attributes of a Web Element (such as ‘id’, ‘classname’, ‘name’), while some locators work with their ‘Tag Name’, on the text or part of text contained by that Web Element.
Overall, A locator in Selenium – allows us to select one or more Web Elements to perform action on them as per the test plan.
There are overall 8 locators in Selenium –
- ‘id’ attribute
- ‘class’ attribute
- ‘name’ attribute
- Tag Name
- Link Text
- Partial Link Text
- CSS Selector
- XPath
To Learn more, Click here –
Q26) How will you test APIs or Web Services using Selenium WebDriver?
Answer –
There is NO way to test an API or a Web Service using Selenium WebDriver. Selenium Framework does not contain any library / class to test APIs. To test an API or a Web Service, we need to take help of third party dependencies such as Rest Assured or tool like Postman.
To Learn more, Click here –
Q27) Do you know, What are the new features of Selenium 4?
Answer –
Features of Selenium 4 –
1. Enhanced Selenium Grid
2. Upgraded Selenium IDE
3. Relative Locators in Selenium 4
4. Support for Chrome Debugging Protocol
5. Improved Documentation
6. Better Window/Tab Management in Selenium 4
7. Deprecation of Desired Capabilities
8. Modifications in the Actions Class
To Learn more, Click here –
Q28) Explain difference between findElement() and findElements() method?
Answer –
Both of these methods are used to find Web Elements on a Web Page. But there are a few differences in their functionalities –
| findElement() | findElements() |
| This method returns the first Web Element, which gets match as per the given locator (xpath / id / class etc.) | This method gives a list of all the web items that match with the given locator. |
A NoSuchElementException is produced, If there are no matching web elements available on Web Page | If there are no matching elements, an empty list is returned |
Syntax : WebElement button = webdriver.findElement(By.name("Put the name value")); | Syntax :List<WebElement> buttonsList = webdriver.findElements(By.xpath("Put the xpath value")); |
To Learn More About This Selenium Interview Questions, Click Here –
Q29) In XPath, what is the difference between single slash “/” and double slash “//”?
Answer –
| Single Slash “/” | Double Slash “/” |
| A single slash is used to create an XPath with an absolute path, i.e., the XPath will begin with the document node/start node. | The double slash is used to construct an XPath with a relative path, which means the XPath can start selection from anywhere on the page. |
Example : /html/body/div/div/form/input | Example : //input[@id = 'email'] |
To Learn more, Click here –
Q30) How many type of WebDriver are available for Selenium?
Answer –
There are different types of WebDriver Application Programming Interfaces in Selenium –
- ChromeDriver
- FirefoxDriver
- OperaDriver
- EdgeDriver
- SafariDriver
To Learn more, Click here –
Q31) What programming languages does Selenium WebDiver support?
Answer –
Selenium supports all major Programming languages, such as –
- Java
- C#
- Python
- Ruby
- Perl
- PHP
To Learn more, Click here –
Q32) Explain WebDriver driver = new FirefoxDriver()?
Answer –
The line of code WebDriver driver = new FirefoxDriver(); is a common statement used in Selenium to create an instance of a web browser driver for Firefox.
What we are doing here is :
WebDriveris an interface in Selenium that defines a set of methods for interacting with web browsers. It acts as a bridge between your test script and various browser drivers. By using theWebDriverinterface, you can write code that is independent of the specific browser you intend to automate.driveris a variable name that represents the WebDriver instance. You can name this variable as you like, butdriveris a common convention used in Selenium scripts.new FirefoxDriver();is the part of the code where you actually create an instance of the FirefoxDriver class.
In this specific line, you’re instructing Selenium to use the Firefox browser for your automation. Thenewkeyword is used to create an object of theFirefoxDriverclass, which implements theWebDriverinterface for Firefox.
After this line of code, the driver object will be ready to control a Firefox browser instance. You can use methods provided by the WebDriver interface, such as get(), findElement(), and click(), to interact with web elements, navigate to web pages, and perform various actions within the browser.
Keep in mind that to use FirefoxDriver, you should have the appropriate WebDriver executable (geckodriver) installed on your system and available in your system’s PATH or specify its location using the webdriver.gecko.driver system property.
Additionally, the Firefox browser should be installed on your machine.
To Learn more, Click here –
Q33) What are some cases that Selenium WebDriver cannot automate??
Answer –
Selenium WebDriver is a powerful framework for automating web applications, but there are certain scenarios and use cases where we can not use it to automate. Some situations, where Selenium WebDriver may not be the best option, are :
- CAPTCHA :
Using Selenium WebDriver to automate Captcha is not possible. - Bitmap Comparison :
Selenium WebDriver does not support bitmap comparison. - Bar Code :
Using Selenium WebDriver, we are unable to read bar codes as of now. - Video streaming scenarios:
Selenium will almost never be able to recognise video controllers. To some extent, JavaScript Executor and flex UI selenium will work, although they are not completely dependable. - Desktop Applications:
Selenium is designed for web applications and cannot automate desktop applications directly. For automating desktop applications, you would need to use tools like Appium (for mobile apps) or desktop automation tools such as WinAppDriver (for Windows desktop applications). - Non-Web GUIs: If your application’s GUI is not web-based and does not have standard HTML elements, Selenium may not work. For example, automating applications with complex custom controls or non-standard UI frameworks would be challenging with Selenium.
- Heavy Graphics Testing: Selenium is primarily focused on functional testing and automating interactions with web elements. It is not designed for heavy graphics testing, such as testing video games or graphics-intensive applications.
- Performance Testing:
While Selenium can be used for some aspects of performance testing (e.g., measuring page load times), it is not a dedicated performance testing tool like JMeter or LoadRunner. - API Testing:
Selenium is not designed for API testing. For testing web services and APIs, you should use tools like Postman, RestAssured, or libraries specifically designed for API testing. - Database Testing:
Selenium cannot directly interact with databases. Database testing requires SQL scripts, database testing tools, or libraries designed for database interactions. - Mobile Application Testing:
While Selenium can be used for mobile web application testing, it is not the best choice for automating native mobile applications. For native mobile app automation, you should use tools like Appium (which can also automate mobile web apps). - Mainframe or Terminal Applications:
Automating mainframe or terminal-based applications requires specialized terminal emulators and scripting languages, not Selenium. - Accessibility Testing:
While Selenium can automate interactions, it may not be the best tool for comprehensive accessibility testing. Dedicated accessibility testing tools like Axe, WAVE, or screen readers are better suited for this purpose. - Security Testing:
Selenium is not a security testing tool. For security testing, you should use specialized tools like OWASP ZAP or Nessus. - Load and Stress Testing:
While Selenium can simulate user interactions, it’s not designed for generating a heavy load on a web application. For load and stress testing, you should use dedicated tools like Apache JMeter or Gatling.
In many of the above scenarios, Selenium can be used in combination with other tools to achieve automation goals. It’s essential to choose the right tool for the specific testing or automation requirements of your project.
To Learn more, Click here –
Q34) What is the key difference between ‘assert’ and ‘verify’ commands in Selenium?
Answer –
Both “assert” and “verify” commands work on a given condition. These commands check whether the given condition is true or false and the only difference between them is that:
- Assert: Assert condition stops the execution of the testing if the given condition is evaluated to false, else would continue with the further tests.
- Verify: Verify the condition doesn’t stop the flow of execution whether the condition’s result becomes true or false.
To Learn more, Click here –
Q35) Does Selenium allows to take screenshots? If yes, then write commands to take Screenshots.
Answer –
Yes, using Selenium we can capture screenshots. There are a couple of commands to handle it –
TakesScreenshot: An interface, that helps a driver to capture a screenshot and store it in different ways.getScreenshotAs(OutputType): The method, which actually takes the screenshot as per the givenOutputType, such as –Base64,BytesandFile.
		File srcSSFile = ((TakesScreenshot) driver).getScreenshotAs(OutputType.FILE);

		FileUtils.copyFile(
			srcSSFile,
			new File(ssFinalFilePath)		// Target Screenshot file..
		);
To Learn more, Click here –
Q36) On a web page, what Selenium commands would you write to select a radio button with name=’gender’ ?
Answer –
To select a radio button with the name attribute ‘gender’ using Selenium in Java, you can follow these steps:
package com.logicalduniya.seleniumInterviewQuestions;

import org.openqa.selenium.By;
import org.openqa.selenium.WebDriver;
import org.openqa.selenium.WebElement;
import org.openqa.selenium.chrome.ChromeDriver;

public class RadioBtnSeleniumExample {

    public static void main(String[] args) {

        // Step 1: Set the path to the ChromeDriver executable
        System.setProperty("webdriver.chrome.driver", "path/to/chromedriver.exe");

        // Step 2: Initialize the Chrome driver
        WebDriver driver = new ChromeDriver();

        // Step 3: Open the web page containing the radio button
        driver.get("https://link-to-webpage-with-radio-button.com");

        // Step 4: Find the radio button element by its name attribute
        WebElement genderRadioBtn = driver.findElement(By.name("gender"));

        // Step 5: Check if the radio button is not already selected
        if ( !genderRadioBtn.isSelected() ) {
            // Click to select the radio button
            genderRadioBtn.click();
        }

        // Step 6: Optionally, you can verify that the radio button is selected
        if (genderRadioBtn.isSelected()) {
            System.out.println("Radio button 'gender' is selected.");
        }

        // Step 7: Close the browser windows.
        driver.quit();
    }
}
What we have done in this Selenium script is:
- First, You need to set the path to the ChromeDriver executable (make sure you’ve downloaded it from the official ChromeDriver website and specify the correct path).
- Then, The script opens a web page containing the radio button. Replace the URL with the actual URL of your web page.
- After that, It finds the radio button element using the
findElementmethod with theBy.namelocator. - After that, It checks if the radio button is not already selected using the
isSelectedmethod. - Then, If the radio button is not selected, it clicks on it using the
clickmethod. - Optionally, it verifies that the radio button is selected after clicking.
- And finally, it closes the browser windows and quits the driver instance.
Remember to replace the URL with the actual URL where you want to interact with the radio button. Make sure to specify the correct path to your ChromeDriver executable.
To Learn more, Click here –
Q37) How to handle multiple windows in Selenium?
Answer –
To handle single and multiple windows in Selenium, there a couple of method available for us. Using web driver object, we can call these functions and work handle multiple windows very easily.
getWindowHandle():
This function is used to retrieve the current window’s id. This function returns the current window id in String format.getWindowHandles():
This function is useful for retrieving the ids of all the windows that are currently opened. This function returns list of window ids in Set of String format.
To get values from this Set, we need to use the Iterator interface. We can also convert this Set to List and easily fetch its values.
Example –
/******************************************************************************

                            LogicalDuniya.com
         Program on - How to handle multiple browser windows in Selenium?
       Copy this program, and run using Java 8 or above to get the results.

*******************************************************************************/

import org.openqa.selenium.WebDriver;

import java.util.ArrayList;
import java.util.Iterator;
import java.util.List;
import java.util.Set;

public class MultipleWindowsHandleTest {

    public static void main(String[] args) {

        // Setup of WebDriver -
        System.setProperty("webdriver.chrome.driver", "path_to_chromedriver_in_your_computer");
		WebDriver driver = new ChromeDriver();

        // 1st approach - To handle windows :
        // Getting all opened browser windows IDs in Set object-
        Set<String> windowsSet = driver.getWindowHandles();

        // Getting iterator to access Set values-
        Iterator it = windowsSet.iterator();

        // Switching to latest window handle-
        driver.switchTo().window( it.next().toString() );

        // 2nd approach - To handle windows :
        // Getting all opened browser windows IDs in List Object-
        List<String> windowsList = new ArrayList<String>(driver.getWindowHandles());

        // Switching to latest window handle-
        driver.switchTo().window( windowsList.get( windowsList.size()-1 ));
    }
}
To Learn more, Simply click here –
Q38) What is WebDriverWait? How to use WebDriverWait?
Answer –
What is WebDriverWait –
Selenium WebDriverWait is one of the Explicit waits.
Explicit waits are confined to a particular web element. Explicit Wait is code you define to wait for a certain condition to occur before proceeding further in the code.
Explicit wait is of two types –
1. FluentWait
2. WebDriverWait
WebDriverWait is applied on certain element with defined expected condition and time. This wait is only applied to the specified element. This wait can also throw exception when element is not found.
The following are the a few of the Expected Conditions that can be used in Explicit Wait –
- alertIsPresent()
- elementSelectionStateToBe()
- elementToBeClickable()
- elementToBeSelected()
- frameToBeAvaliableAndSwitchToIt()
and many more
How to use WebDriverWait –
The below Selenium script is using WebDriverWait to wait for a specific element until it becomes clickable on a web page –
WebDriverWait wait = new WebDriverWait(driver, Duration.ofSeconds(timeoutSeconds));

WebElement searchedElementBtn =
	 wait.ignoring(NoSuchElementException.class)
	     .until(ExpectedConditions.elementToBeClickable(By.id("btn-login")));
Here’s an explanation of each part of the script:
- WebDriverWait:
WebDriverWait is a Selenium class that allows you to wait for a certain condition to be met before proceeding with the test. In this case, it’s used to wait for an element to become clickable. - wait:
This is an instance of WebDriverWait that we’re creating. We need to pass two parameters to it: the WebDriver instance (driver) and a timeout duration. The timeout duration specifies the maximum amount of time to wait for the expected condition to be met. - Duration.ofSeconds(timeoutSeconds):
This part of the script sets the timeout duration. It specifies the maximum time, in seconds, that the WebDriverWait should wait for the expected condition to be met.timeoutSecondsis a variable or constant that holds the number of seconds you want to wait. - WebElement searchedElementBtn:
Here we are creating a reference variable where the reference type is WebElement. - wait.ignoring(NoSuchElementException.class):
Here, We are tellingWebDriverWaitto ignore the “NoSuchElementException” exception during the waiting period. This means that if the element we are looking for is not found, it won’t immediately throw an exception. Instead, it will continue to wait until the timeout duration is reached. - until():
Theuntilmethod is used to specify the expected condition that needs to be met. In this case, it’sExpectedConditions.elementToBeClickable(...), which means it waits for the element to become clickable. - By.id(“btn-login”):
This part specifies how to locate the element you are waiting for. In this case, it’s located by its ID attribute, with the value “btn-login”.
To Learn More About This Selenium Interview Questions For Freshers, Click Here –
Q39) How to retrieve the value of an attribute in Selenium WebDriver?
Answer –
Once you locate the WebElement, on that webelement object you need to use the getAttribute("some_name") method. It returns the value of the parameterised attribute.
Selenium Interview Questions and Answers – For Experienced🔺
In this section, we will focus on little complex and advanced Selenium Interview Questions and Answers for Experienced Candidates. We have also tried to provide enough details with learn more link to the guide. So let’s get started from the very first Selenium Interview Questions for Experienced persons having 3 years to 8 years of experience –
Q40) What OOPs concepts have you implemented in your Automation Framework using Selenium?
Answer –
To answer this question, you first need to explain what is OOPs, what are its key principles and then How have you implemented these principles in your Automation Framework. So, here you go –
OOPs stands for Object Oriented Programming structure. It is an approach to write programs that are large, complex and require frequent update or maintenance. The core building blocks of OOPs are – Classes, Objects, Methods, Attributes etc. If I list of a few of its key principles, then those are –
- Abstraction
- Inheritance
- Polymorphism
- Encapsulation
The next part of this answer, depends on how you have actually implemented the OOPs principles in your framework, so you might need to give answer after updating it a bit, but a sample answer would look like this –
1. How I’ve implemented Abstraction ?
Abstraction is the methodology of hiding the implementation of internal details and showing the functionality to the users.
WebDriver driver = new FirefoxDriver();Here WebDriver is an Interface.
In Java, abstraction is achieved by interfaces and abstract classes. Using interfaces, we can achieve 100% abstraction.
2. How I’ve implemented Inheritance ?
Inheritance is a mechanism in Java by which one class gets access to use the properties (instance variables) and functionalities of another class.
We have created a Base Class in the Automation Framework to initialize WebDriver interface, WebDriver waits, Property files, Excels, etc., in the Base Class.
Then, we have extended the Base Class in other classes such as Test Classes and Utility Classes.
Here we extend one class (Base Class like WebDriver Interface) into another class (like Test Class, Utility Class), which is nothing but implementation of Inheritance.
3. How I’ve implemented Polymorphism ?
Method OverLoading is a way to implement Polymorphism. In method overloading, what happens is – If two methods of a class (whether both declared in the same class, or both inherited by a class, or one declared and one inherited) have the same name but different signatures, then the method name is said to be overloaded.
In our framework, under the Login test cases method, we have overloaded doLogin() method.
public void doLogin(String emailId, String password) {
 ... // Logic of Login..
}

public void doLogin(String userName, String password, String companyName) {
 ... // Logic of Login as an admin of a Company..
}
First doLogin() method takes email id and password to login to application as a general user, while the other doLogin() method takes username, password and companyName to login as an admin of the given company name.
Similarly, we have implemented Polymorphism in our SeleniumHelper class as well by over loading the findWebElementById(..) method –
SeleniumHelper.java -

findWebElementById(String idString, String frameName )

findWebElementById(String idString, String frameName, int timeout )
4. How I’ve Implemented Encapsulation ?
In OOPs, Encapsulation is a mechanism of binding code and data (variables) together as a single unit. We create Class and Objects to implement Encapsulation.
In our framework, we have implemented Encapsulation on various places, such as all the page classes, utility classes are the best examples.
To Learn more, Click here –
Q41) Is it necessary to use Selenium Server to run Selenium WebDriver scripts?
Answer –
Selenium Server is required when distributing Selenium WebDriver scripts for execution with Selenium Grid.
Selenium Grid is a Selenium functionality that allows you to execute test cases on multiple machines on various platforms (such as Windows, macOS, Linux). There are some scenarios when we wish to execute your test cases on a remote machine because your local machine is running numerous applications. So, in that case we need to set up the remote server so that the test cases can run on it.
To Learn more, Click here –
Q42) How to perform Mouse Hover Action in Selenium ?
Answer –
The most efficient solution to perform mouseover function in Selenium and Java is using the moveToElement(..) method of Actions class. Once we get the Actions class object, we can call the moveToElement(..) using the Actions object and pass the target element on which we want the mouse cursor should be moved.
Here are some of the ways to achieve mouseover functionality using Selenium WebDriver –
public void DragAndDropTest() {

		driver.manage().window().maximize();
		driver.get("https://codepen.io/LogicalDuniya/full/oNmNVem");
		driver.switchTo().frame("result"); // switch to available frame..

		WebElement rat = driver.findElement(By.id("rat"));
		WebElement cat = driver.findElement(By.id("cat"));
		WebElement lion = driver.findElement(By.id("lion"));

		Actions actions = new Actions(driver);

//		Way -- 1 :
  		actions.clickAndHold(rat)
 			.moveToElement(cat)
 			.release()
 			.build().perform();

//		Way -- 2 :
//		actions.dragAndDrop(rat, cat)
//		.build().perform();

//		Way -- 3 :
//		int x = cat.getLocation().x;
//		int y = cat.getLocation().y;
//
//		actions.moveToElement(rat)
//			.pause(Duration.ofSeconds(1))
//			.clickAndHold(rat)
//			.pause(Duration.ofSeconds(1))
//			.moveByOffset(x, y)
//			.moveToElement(cat)
//			.moveByOffset(x, y)
//			.pause(Duration.ofSeconds(1))
//			.release().build().perform();

//		Way -- 4 : Thought to set X,Y axises of dropData, but not possible without JS
//		int xr = rat.getLocation().x;int yr = rat.getLocation().y;int xc = cat.getLocation().x;int yc = cat.getLocation().y;
//		SeleniumHelperUtil.log("Rat:: Top="+rat.getCssValue("top")+",Left="+rat.getCssValue("left"));
//		SeleniumHelperUtil.log("Cat:: Top="+cat.getCssValue("top")+",Left="+cat.getCssValue("left"));

//		SeleniumHelperUtil.log("Axis: Rat("+xr+","+yr+")\n"+"Cat("+xc+","+yc+")");

		SeleniumHelperUtil.log("Cat has eaten the Rat..");

		// Next thing to try is to - With Way 2 AND On
		// Show the Drag & Drop demo on site - jqueryui.com/droppable
	}
To Learn more, Click here –
- How to get mouseover text in Selenium WebDriver Java?
- How to perform mouseover function in Selenium WebDriver using Java?
Q43) How to get HTTP Response Code using Selenium WebDriver?
Answer –
In Selenium, there is no way to get HTTP Response Code for any HTTP request. It’s not possible using the Selenium WebDriver API.
However, to get the HTTP Response Code we can use pure Java. There is a class HttpURLConnection, which allows use to check the Response Code and Response Status for any URL that we hit. Below is a simple example –
// Step 1 : Create the object for HttpURLConnection and pass the URL -
HttpURLConnection httpConnection = (HttpURLConnection) new URL( "https://google.com" ).openConnection();

// Step 2 : Go the URL -
httpConnection.connect();

// Step 3 : Get the Response Code and Response Message -
int respCode = httpConnection.getResponseCode();
String respMsg = httpConnection.getResponseMessage();

System.out.println("Response Code = "+ respCode);
System.out.println("Response Status = "+ respMsg);

// Step 4 : Disconnect the HTTP Connection -
httpConnection.disconnect();
Full Example –
/******************************************************************************

                            LogicalDuniya.com
           Program to check HTTP Response Code and Response Status
       Copy this program, and run using Java 8 or above to get the results.

*******************************************************************************/
package com.logicalduniya.interview.selenium;

import java.net.HttpURLConnection;
import java.net.URL;
import java.util.LinkedList;
import java.util.List;
public class Main {
    public static void main(String[] args) throws Exception {

        System.out.println("Starting..");

        // Step 1 : Create the object for HttpURLConnection and pass the URL -
        HttpURLConnection httpConnection = (HttpURLConnection) new URL("https://google.com").openConnection();

        // Step 2 : Go the URL -
        httpConnection.connect();

        // Step 3 : Get the Response Code and Response Message -
        int respCode = httpConnection.getResponseCode();
        String respMsg = httpConnection.getResponseMessage();

        System.out.println("Response Code = " + respCode);
        System.out.println("Response Status = " + respMsg);

        // Step 4 : Disconnect the HTTP Connection -
        httpConnection.disconnect();

        System.out.println("Ending..");
    }
}
Output –
Starting..
Response Code = 200
Response Status = OK
Ending..
To Learn more, Click here –
Q44) How to Select Value from DropDown using Selenium WebDriver?
Answer –
To select a value from a DropDown element, we need to use Select class of Selenium Library. In Select class, there is a method selectByValue() which selects an option by the values of it’s ‘value‘ attribute.
Let’s say, There is a dropdown element to select Fruits and you need to use Selenium to pick
HTML Code –
<span>
    Fruits Options =
</span>
<select id="fruits">
    <option values="banana">
        Banana
    </option>
    <option values="apple">
        Apple
    </option>
    <option values="orange">
        Orange
    </option>
    <option values="mangoes">
        Mangoes
    </option>
</select>
HTML Output –

Selenium Code –
public static void main(String[] args) {

  WebDriver driver = new ChromeDriver();
  driver.get("https://codepen.io/LogicalDuniya/full/qBgEWvx");

  // Grab the Select element from Webpage -
  Select fruitsList = new Select( driver.findElement(By.id("fruits")));

  // Select option using value
  fruitsList.selectByValue("mangoes");
}
Selenium Output –

To Learn more, Click here –
Q45) How to switch to the new browser window, which opens after clicking on a button?
Answer –
In Selenium, we can use getWindowHandle() and getWindowHandles() method with driver object. These methods help use to switch to any browser window that is currently opened. Here’s is sample code –
Selenium Code Solution –
// Store the current window handle -
String winHandleBefore = driver.getWindowHandle();

// Perform the click operation that opens new window -

// Switch to recently opened browser window -
List<String> windowsList = new ArrayList<String>(driver.getWindowHandles());
driver.switchTo().window( windowsList.get(windowsList.size()-1 ));


// Perform the actions on new window -

// Close the new window, if that window no more required -
driver.close();

// Switch back to original browser (first window) -
driver.switchTo().window(winHandleBefore);

// Continue with original browser (first window) -
// ...
To Learn more, Click here –
Q46) How to Find Broken Links in Selenium? Explain properly with code.
Answer –
On any website, there might be some Links or URLs present that are not reachable, such links are known as broken links. They may be unavailable or inoperable due to a server issue. A URL’s status will always be in between 200 to 299, indicating that it is valid response. There are different types of HTTP status codes that represent different types of responses.
HTTP status 400 to 499 and 500 to 599 indicate an invalid request or broken links.
So, any response code that is in the 4xx class of status codes is used for client-side errors, while the 5xx class is used for server response errors.
Here is the Selenium based code snippet to find out broken links –
// Require to Import classes / APIs -
import java.net.HttpURLConnection;
import java.net.URL;
import java.util.LinkedList;
import java.util.List;
import org.openqa.selenium.By;
import org.openqa.selenium.WebDriver;
import org.openqa.selenium.WebElement;

	public void testWebpageBrokenLinksPresence() throws Exception {

		// 1. Setup and Open Browser to Go the webpage,
		// 2. Collect all links and active links of <a> and <img> elements that have 'href' attribute with values like "http" and not like "javascript:"
		// 3. Use HTTPURLConnection and URL classes with openConnection() method to verify, whether the links are active or not.


		// 1. Setup and Open webpage :
		driver.get("https://google.com");


		// 2: Collect elements that have 'href' value= 'http...'
		List<WebElement> allLinksImgsElements = driver.findElements(By.tagName("a"));
		allLinksImgsElements.addAll( driver.findElements(By.tagName("img")));

		List<String> activeLinks = new LinkedList<String>();

		for(WebElement e : allLinksImgsElements) {

			String attrHref = e.getAttribute("href");
			SeleniumHelperUtil.log(attrHref);

			// Removing links which are using js to launch url..
			if ( ! attrHref.contains("javascript:") ) {
				activeLinks.add(attrHref);
			}
		}


		// 3. Verify, whether the link is active or not..

		for(String strURL : activeLinks) {

			HttpURLConnection httpConnection = (HttpURLConnection) new URL( strURL ).openConnection();
			httpConnection.connect();
			int respCode = httpConnection.getResponseCode();
			String respMsg = httpConnection.getResponseMessage();

			// Catching the broken links based on their response code -
			if( respCode >= 400 && respCode < 600) {
				System.out.println("Found Broken Link = " + strURL);
			}
			httpConnection.disconnect();

			SeleniumHelperUtil.log(" "+ respMsg + " <-- " + strURL);
		}
	}
To Learn more, Click here –
Q47) How does a Selenium WebDriver interact/work with the browser?
Answer –
For each Selenium command, the communication flow between WebDriver and Broswer happens like below diagram:

- For each Selenium command of the automation script, a HTTP request is created and sent to the browser driver.
- The browser driver uses a HTTP server for getting the HTTP requests.
- The HTTP server determines the steps needed for implementing the Selenium command.
- The implementation steps are executed on the browser.
- The execution status is sent back to the HTTP server.
- The HTTP server sends the status back to the automation script.
JSON Wire Protocol – A short note for You :
- WebDriver communicates with browsers using the JSON Wire Protocol. This protocol / rule defines a set of RESTful HTTP methods for sending or receiving commands and data to or from the real browsers.
- When you write Selenium test scripts, WebDriver libraries send JSON HTTP requests to browser drivers, which interpret and execute those commands in the browser.
To Learn more, Click here –
Q48) What are Selenium WebDriver Listeners?
Answer –
Selenium WebDriver Listeners are a powerful mechanism that allows you to capture and handle events and actions that occur during test automation. Listeners are particularly useful for logging, reporting, or taking custom actions based on the events in your automation scripts. In Selenium, you can implement listeners by extending various listener interfaces provided by WebDriver.
Here’s an example of how to use Selenium WebDriver Listeners with Java:
- Create a Test Class: First, create a test class where you define your test methods. In this example, we’ll use a simple test that searches for a keyword on Google.
import org.openqa.selenium.By;
import org.openqa.selenium.WebDriver;
import org.openqa.selenium.WebElement;
import org.openqa.selenium.chrome.ChromeDriver;
import org.testng.annotations.Test;

public class GoogleSearchTest {

    WebDriver driver;

    @Test
    public void testGoogleSearch() {
        System.setProperty("webdriver.chrome.driver", "path/to/chromedriver_binary_file");
        driver = new ChromeDriver();

        driver.get("https://www.google.com");
        WebElement searchBox = driver.findElement(By.name("q"));

        searchBox.sendKeys("Selenium WebDriver");
        searchBox.submit();
    }
}
- Create Listener Classes: Create custom listener classes that implement listener interfaces. There are several listener interfaces in Selenium WebDriver, such as
WebDriverEventListenerandEventListener. For this example, we’ll use theWebDriverEventListenerinterface.
import org.openqa.selenium.By;
import org.openqa.selenium.WebDriver;
import org.openqa.selenium.WebElement;
import org.openqa.selenium.support.events.WebDriverEventListener;

public class CustomWebDriverListener implements WebDriverEventListener {

    @Override
    public void beforeAlertAccept(WebDriver webDriver) {
        // Actions to perform before accepting an alert
    }

    @Override
    public void afterAlertAccept(WebDriver webDriver) {
        // Actions to perform after accepting an alert
    }

    // Implement other listener methods as needed
}
- Set Up Listener with WebDriver: To use the custom listener, you need to create an instance of it and register it with your WebDriver instance.
import org.openqa.selenium.chrome.ChromeDriver;
import org.openqa.selenium.support.events.EventFiringWebDriver;

public class GoogleSearchTest {

    WebDriver driver;

    @Test
    public void testGoogleSearch() {
        System.setProperty("webdriver.chrome.driver", "path/to/chromedriver.exe");
        driver = new ChromeDriver();

        // Create an instance of your custom listener
        CustomWebDriverListener customListener = new CustomWebDriverListener();

        // Create an EventFiringWebDriver with your driver and listener
        EventFiringWebDriver eventDriver = new EventFiringWebDriver(driver);
        eventDriver.register(customListener);

        eventDriver.get("https://www.google.com");
        WebElement searchBox = eventDriver.findElement(By.name("q"));
        searchBox.sendKeys("Selenium WebDriver");
        searchBox.submit();
    }
}
Now, when you run your test, the custom listener (CustomWebDriverListener) will capture events and actions like beforeAlertAccept and afterAlertAccept. You can extend the listener to capture other events as needed, such as element interactions or navigation events.
This is a basic example of how to use Selenium WebDriver Listeners. In real-world scenarios, listeners can be used for logging, reporting, or taking specific actions based on the events during test execution.
To Learn more, Click here –
Q49) How do you handle AJAX calls in Selenium WebDriver?
Answer –
AJAX stands for Asynchronous JavaScript & XML, and it works within the Web page to fetch small amounts of data from the server without reloading the entire web page.
The biggest challenge in handling AJAX call is knowing the loading time for the web page. Since the loading of the AJAX part of the web page can last from a fraction of seconds to a few minutes, hence it is way more difficult for the automation tester to test such an application through automation tool. For that, Selenium WebDriver has to use the Wait method on each AJAX call.
So by executing a wait command, selenium will suspend the execution of current Test Case and wait for the expected or new value. When the new value or field appears, the suspended test cases will get executed by Selenium WebDriver.
There are hard waits, such as Thread.sleep() and implicit waits in Selenium, but these are not advisable due to AJAX’s uncertain time taking behaviour. So, It is always better to use any of the Explicit Waits –
WebDriverWait –
- It can be used for any conditions. This can be achieved with
WebDriverWaitin combination withExpectedConditionsclass. - The best way to wait for an element dynamically is checking for the condition every second and continuing to the next command in the script as soon as the condition is met.
But the problem with all these waits is, you have to mention the time out unit. What if the element is still not present within the time? So there is one more wait called Fluent wait.
FluentWait –
- This is an implementation of the Wait interface having its timeout and polling interval.
- Each
FluentWaitinstance determines the maximum amount of time to wait for a condition, as well as the frequency with which to check the condition.
To Learn more, Click here –
Q50) How can we inspect the web element attributes in order to use them in different locators?
Answer –
In order to locate web elements, we can use the Developer tool and plugins like Firebug / SelectorsHub.
We can launch the developer tool by pressing F12 (in windows) / CMD + Shift + I (in mac) on the browser. Users can easily hover over any element and find its different HTML properties.
Firebug / SelectorsHub are some plugins for Firefox and Chrome browsers which provide various development tools for debugging applications. From an automation perspective, we use these plugin specifically for identifying web elements uniquely in order to find their attributes like id, class, name, etc. in different locators.
To Learn more, Click here –
Q51) How can we locate an element by only partially matching the value of its attributes in XPath?
Answer –
Using methods like contains() method we can locate an element by partially matching any of its attribute’s value. This is particularly helpful in scenarios where the attributes have dynamic values with a certain constant part.
XPath provides various functions that allow you to perform complex searches. For example, you can use contains(), starts-with(), and text() functions to match elements based on their content. Here’s an example using contains():
WebElement element = driver.findElement(By.xpath("//input[contains(@class, 'user')]"));The above XPath will try to get all WebElements which are containing text ‘user’ in its class attribute. Some examples are –
<input class="username" placeholder="Enter Username"/>We can also combine XPath with other locators like id, class, or name. This is especially useful when you want to locate an element based on multiple attributes.
WebElement element = driver.findElement(By.xpath("//*[@id='username' and @name='login']"));XPath also provides various axes (e.g., parent, child, following-sibling, preceding-sibling) that allow you to navigate through the document tree. For example, you can use parent to select an element’s parent:
WebElement parentElement = driver.findElement(By.xpath("//input[@id='username']/parent::div"));To Learn more, Click here –
Q52) How can we move to the parent of an element using XPath?
Answer –
Using ‘/..‘ after the XPath expression of the child element, we can move to the parent of an element.
For example, the locator //div[@id=”child-element-ID”]/.. will move to the parent of the div element with id value as ‘child-element-ID’.
To Learn more, Click here –
Q53) How can we move to the nth-child element using XPath?
Answer –
There are multiple ways of navigating to the nth element using XPath –
- Using square brackets with index position-
Example –img[2]will find the second image element. - Using position() –
Example –a[position()=3]will find the third anchor element.
To Learn more, Click here –
Q54) What are CSS Selectors? What are different ways to find WebElements using CSS Selectors?
Answer –
CSS Selector is a pattern or in simple terms – a formula, that uses CSS to prepare a pattern and search for the web elements.
CSS is basically a styling language. CSS is a short of Cascading Style Sheets, that helps any website to look colourful and in proper layout. Along with HTML, CSS is fundamental pillar of web designing. Without CSS, websites would still be plain text on white backgrounds with minimum colours and graphics.
The CSS Selectors basically use the character sequence pattern, which identifies the web elements based on their HTML structure, attributes or values.
Searching for an element on a web page using CSS selector may seem a little difficult than using attributes like id, name, link, etc. but it’s one of the most efficient strategies to locate dynamic elements that don’t have consistent HTML attributes.
There are 5 types of CSS Selectors that can also be used in Selenium tests to write XPath or locate web elements :
| CSS Selector | Symbol | Syntax | Example |
| ID | # (hashtag) | #idValue Or tagName#idValue | #email Or input#email |
| Class | . (dot) | .classnameValue Or tagName.classnameValue | .center-text Or input.center-text |
| Attribute | [ ] (brackets) | tag[attributeName=value] | input[type=’password’] |
| Sub-String | ^ , * , $ | tagName[attribute^=’substring’] | button[class^=’signup’] |
| Inner String | (A Text) | tagName[contains(text(),”string”)] | //button[contains(text(),’Sign up’)] |
If we take above HTML code example scenario and let’s assume we need to uniquely identify that span element which is containing the above bordered anchor tag. Then, in that case here is how we can take help of CSS Selector method of Selenium –
HTML Code –
<span class="logo">
  <a href="/">
    <img src="/imgs/logo128.png?v=1.1" alt="Edit Pad - Free Online Text Editor"
    width="16" vspace="0" hspace="2" height="16" border="0" align="bottom">
    Editpad
  </a>
</span>
CSS Selector Syntax –
In this scenario to find locate the span element, we can take help of class CSS Locator. We use the . (dot) notation.
Selenium Code –
The Selenium code to click on the span element using cssSelector() method would be like –
WebElement element = driver.findElement(By.cssSelector("span.logo")); // Finds span element having 'logo' in class attribute.

// or

WebElement element = driver.findElement(By.cssSelector(".myForm"));   // Finds any element having 'logo' in class attribute.
To Learn more, Click here –
Q55) In how many ways you can click on WebElement using Selenium WebDriver?
Answer –
Let’s say, we want to click on a button web element, then below are some methods that will be useful to click on that button –
0) Using click() method – Always recommended
WebDriver driver = new ChromeDriver();
driver.get("http://google.com");
WebElement signInBtn = driver.findElement(By.xpath("//input[name='btnK']);

// direct method from the API which is recommended always
signInBtn.click();
1) Using Return Key
signInBtn.sendKeys(Keys.RETURN); 2) Using JavascriptExecutor
// 2.1
    JavascriptExecutor js = (JavascriptExecutor)driver;
    js.executeScript("arguments[0].click();", signInBtn);

// 2.2
    JavascriptExecutor js = (JavascriptExecutor) driver;
    js.executeScript("document.getElementsByName('btnK')[0].click()");
3) Using Actions class
// 3.1
    Actions actions = new Actions(driver);
    actions.click(signInBtn).perform();

// 3.2
    Actions actions = new Actions(driver);
    actions.moveToElement(signInBtn).click().perform();

// 3.3
    Actions actions = new Actions(driver);
    actions.clickAndHold(signInBtn).release().perform();

// 3.4
    Actions actions = new Actions(driver);
    actions.sendKeys(signInBtn, Keys.RETURN).perform();
To Learn more, Click here –
Q56) What is same origin policy? How you can avoid same origin policy??
Answer –
Same Origin Policy (SOP):
- SOP is a security feature in web browsers. It’s designed to prevent web pages from making requests to a different domain than the one that served the web page.
SOP in Selenium:
- In the context of Selenium testing, the Same Origin Policy poses a challenge. Selenium scripts run in the browser but are often used to test web applications hosted on different servers or domains.
Proxy Injection for Bypassing SOP:
- To overcome the Same Origin Policy, Selenium uses a method known as “proxy injection.” In this method, the Selenium Server acts as a client-configured HTTP proxy. It sits between the web browser (used for testing) and the application under test (AUT).
- The Selenium Server intercepts requests from the browser to the AUT and acts as a proxy. It then forwards these requests to the real application server under test.
- The crucial part is that the Selenium Server masks the AUT under a fictional URL. This fictional URL essentially makes it appear as if the application is served from the same domain as the Selenium script itself.
In simpler words, proxy injection allows Selenium to bypass the Same Origin Policy by acting as a middleman (proxy) between the browser running the Selenium script and the application being tested. This way, Selenium can access and manipulate elements of a web page, even if they are on a different domain, by routing requests through the Selenium Server.
To Learn more, Click here –
Q57) How you can use “submit” a form using Selenium?
Answer –
There are multiple ways to ‘submit’ a form using Selenium.
One way is, we can use submit() method on element to submit form –
theWebElement.submit();Alternatively you can use click() method on the element which does form submission –
theWebElement.click();To Learn more, Click here –
Q58) What is the difference between Implicit wait and Explicit wait?
Answer –
Implicit Wait –
The behaviour of implicit wait is not crystal clear. It is not properly documented, also most of the time it does not work as expected. Which means, the waiting period varies as per the given Implicit Wait.
Also, it is a global wait. Which mean, once we implemented this wait, it will be applied to everywhere wherever applicable.
Explicit Wait –
It is a one-timer wait or specific wait. It only works for the assigned WebElement or Object.
It’s documentation is proper. Also, the behaviour of Explicit waits are clear and reliable.
To Learn more, Click here –
Q59) How to find Broken Images using Selenium Java?
Answer –
We can take help of HTTP Status Response code, that we receive every time when we hit a URL for any resource over HTTP.
Let’s see a test scenario to find broken images on a website, that is having 2 broken images and 1 properly loaded image. To find broken images using Selenium – Java, here is a test plan :
Test Plan :
- Go to https://the-internet.herokuapp.com/broken_images on Chrome (latest)
- Read the details about the images present on the page
- Send HTTP request for each image
- Check the response code of the HTTP request. If the response code is 200, the image is not broken; else, the image is broken.
- Print whether the image is broken or not on the terminal
The URL under test https://the-internet.herokuapp.com/broken_images has two broken images and one proper image.
Webpage with Broken Images –
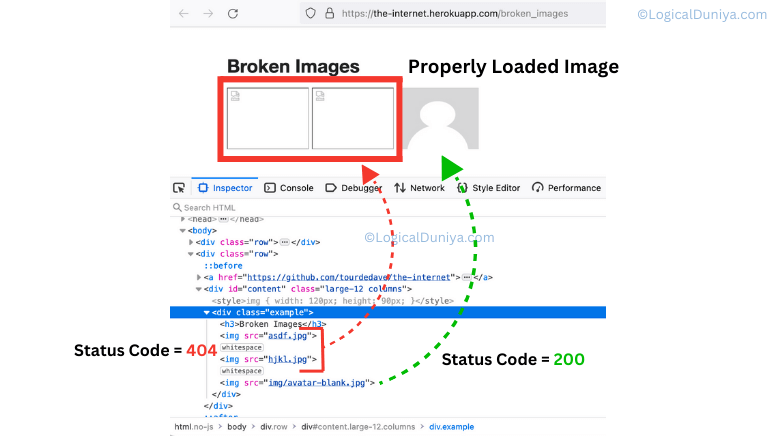
Selenium Code Example –
/******************************************************************************

                            LogicalDuniya.com
              Program to find Broken Images using Selenium Java?
       Copy this program, and run using Java 8 or above to get the results.

*******************************************************************************/

import org.openqa.selenium.WebDriver;
import org.openqa.selenium.WebElement;

import java.util.List;

import org.apache.http.HttpResponse;
import org.apache.http.client.HttpClient;
import org.apache.http.client.methods.HttpGet;
import org.apache.http.impl.client.HttpClientBuilder;
import org.openqa.selenium.By;
import java.net.URL;

public class BrokenImageTest
{
    public void SeleniumBrokenImagesTest()
    {
        Integer iBrokenImageCount = 0;
        System.setProperty("webdriver.chrome.driver",
						"Path_To_Chrome_Driver_In_Your_Computer");
        WebDriver driver = new ChromeDriver();
        driver.navigate().to("https://the-internet.herokuapp.com/broken_images");
        driver.manage().window().maximize();

        try
        {
            List<WebElement> imagesList = driver.findElements(By.tagName("img"));

            /* Print the total number of images on the page */
            System.out.println("The page under test has " + imagesList.size() + " images");
            for (WebElement img : imagesList)
            {
                if (img != null)
                {
                    HttpClient client = HttpClientBuilder.create().build();
                    HttpGet request = new HttpGet(img.getAttribute("src"));
                    HttpResponse response = client.execute(request);
                    /* For valid images, the HttpStatus will be 200 */
                    if (response.getStatusLine().getStatusCode() != 200)
                    {
                        System.out.println(img.getAttribute("outerHTML") + " : This Image Link is Broken.");
                        iBrokenImageCount++;
                    }
                }
            }
        }
        catch (Exception e)
        {
            e.printStackTrace();
            status = "failed during test case execution. ";
            System.out.println("Reason = "+e.getMessage());
        }
        status = "passed";
        System.out.println("Result ==> The webpage '" + URL + "' has " + iBrokenImageCount + " broken images");
    }
}
To Learn more, Click here –
Q60) Explain how you can handle colours in Selenium WebDriver?
Answer –
Handling colours in Selenium WebDriver typically involves extracting colours information from web elements, such as text or background colour, and making assertions based on the expected colour. Below are the general steps to handle colour in Selenium WebDriver:
- Locate the Web Element:
First, locate the web element (e.g., text, background) whose colour you want to verify. You can use various locators like ID, XPath, CSS selectors, etc., to find the element. - Get the Color Attribute:
Once you have the element, retrieve its colour attribute. The color attribute can be different based on what you’re trying to access (e.g., colour of text, background colour). You can use methods likegetCssValue()to obtain the colour value.
For example:
   WebElement element = driver.findElement(By.id("myElement"));
   String textColor = element.getCssValue("color");
String bgColor = element.getCssValue("background-color");- Verify the Color:
Once you have the colour attribute, you can compare it to the expected color. The colour values retrieved from the element’s CSS properties are usually in RGB or RGBA format. You might need to convert these values into a format you can compare with your expectations.
For example, to verify the text colour is red –
   if (textColor.equalsIgnoreCase("rgba(255, 0, 0, 1)") || textColor.equalsIgnoreCase("rgb(255, 0, 0)")) {
       // Color is red
   } else {
       // Color is not red
}- Assertions and Reporting:
Based on the color comparison, you can assert whether the color is as expected. If the assertion fails, you can log or report the issue. - Repeat for Other Elements:
If needed, repeat the process for other elements with different color attributes.
The colour comparisons can be sensitive to variations in browsers and operating systems. It’s essential to consider these differences when setting your expected colours and handling colour-related verifications in your Selenium tests.
Also, you can use libraries like Java’s AWT or external colour-matching libraries to convert and compare colour values in a more human-readable format. These libraries can be useful for handling complex colour verification scenarios.
To Learn more, Click here –
Q61) What are different ways to switch between frames using Selenium WebDriver ?
Answer –
In Selenium WebDriver, there are several ways to switch between frames when working with iframes or frames on a web page. The choice of method depends on the specific requirements of your automation script and the structure of the web page. Here are the main methods for switching between frames:
- Using
switchTo().frame()by Index:
You can switch to a frame by its index (0-based). For example, to switch to the first frame on a page:
driver.switchTo().frame(0);- Using
switchTo().frame()by Name or ID:
If a frame has a name or ID attribute, you can switch to it using that attribute:
driver.switchTo().frame("frameName");
// or
driver.switchTo().frame("frameId");- Using
switchTo().frame()by WebElement:
You can switch to a frame by passing a WebElement reference. First, locate the frame element and then switch to it:
WebElement frameElement = driver.findElement(By.id("frameId"));
driver.switchTo().frame(frameElement);- Using
switchTo().frame()by Frame Locator (XPath, CSS, etc.):
You can locate a frame by specifying its XPath, CSS selector, or other locators:
WebElement frameElement = driver.findElement(By.xpath("//iframe[@class='my-frame']"));
driver.switchTo().frame(frameElement);- Using
switchTo().parentFrame():
To switch back to the parent frame (i.e., the frame that currently contains the frame you’re in), you can use:
driver.switchTo().parentFrame();- Using
switchTo().defaultContent():
To switch back to the default content (main page), you can use:
driver.switchTo().defaultContent();- Using
switchTo().frame()by Frame Index usingdriver.findElements():
In cases where you need to switch to a frame by index, but you don’t know the total number of frames beforehand, you can usedriver.findElements()to find all frames and then choose the one you want by index:
List<WebElement> frames = driver.findElements(By.tagName("iframe"));

// Switch to the second frame
driver.switchTo().frame(frames.get(1));
Each method has its use cases. You should choose the one that best suits your scenario based on the frame’s attributes, structure, and how you want to interact with the content inside the frame.
To Learn more, Click here –
Q62) How to handle File Upload using Selenium WebDriver?
Answer –
The file upload dialog could be handled using Selenium, when the input element is of type file. An example of it, could be found on this web page- https://the-internet.herokuapp.com/upload We will require to have a file available with us, which we need to upload.
The code to upload the file can be like –
// To import selenium-snapshot file.
driver.findElement(By.id("file-upload-buttons-id")).sendKeys(imagePath.toString());
driver.findElement(By.id("file-submit")).submit();

if(driver.getPageSource().contains("File Uploaded!")) {
	System.out.println("file uploaded");
}
else{
	System.out.println("file not uploaded");
}
To Learn More, Click Here –
Q63) How to handle multiple browser windows?
Answer –
getWindowHandles(): It is used to get the address of all the open browser and its return type is Set <String>
getWindowHandle(): It is used to get the address of the current browser where the control is and return type is String.
To Learn more, Click here –
Q64) What is Desired Capability? How is it useful in Selenium WebDriver ?
Answer –
Desired Capabilities in Selenium WebDriver is an integral part of the test automation framework. They are a set of key-value pairs that configure the properties and settings for a WebDriver session. Desired Capabilities are used to customize and specify the behavior of the WebDriver, including which browser to use, browser version, and various other settings.
Here’s how Desired Capabilities are useful in Selenium WebDriver:
- Browser and Browser Version Selection: You can specify which browser you want to use for your test, such as Chrome, Firefox, or Safari. Additionally, you can specify the version of the browser to ensure compatibility.
- Platform and OS Configuration: Desired Capabilities can be used to specify the target operating system (e.g., Windows, macOS, Linux) on which you want to run your tests.
- Handling Browser Profiles: You can customize browser profiles to manage settings, extensions, and preferences. For example, you can set up custom Firefox profiles or Chrome profiles for your tests.
- Mobile Testing: When conducting mobile testing, you can use Desired Capabilities to configure mobile-specific settings like device name, platform name, and app package/app activity for Android testing.
- Remote Testing: If you are using a remote WebDriver like Selenium Grid, you can specify the remote server’s address and port using Desired Capabilities.
Here’s an example of how you can use Desired Capabilities in Selenium WebDriver:
/******************************************************************************

                            LogicalDuniya.com
              Program to understand What is Desired Capability?
       Copy this program, and run using Java 8 or above to get the results.

*******************************************************************************/

import org.openqa.selenium.WebDriver;
import org.openqa.selenium.chrome.ChromeDriver;
import org.openqa.selenium.remote.DesiredCapabilities;

public class DesiredCapabilitiesSeleniumExample {

    public static void main(String[] args) {

        DesiredCapabilities capabilities = new DesiredCapabilities();
        capabilities.setCapability("browserName", "chrome");
        capabilities.setCapability("browserVersion", "101");
        capabilities.setCapability("platform", "Windows 7");

        WebDriver driver = new ChromeDriver(capabilities);

        // Your test logic here

        driver.quit();
    }
}
To Learn more, Click here –
Q65) How you can capture server side log Selenium Server?
Answer –
Capturing server-side logs from Selenium Server is a powerful technique for debugging and analysing issues of your automation tests. To gather server-side log details, you can use the -log command while starting Selenium Server.
Steps –
- Open your command prompt or terminal.
- Navigate to the directory where your Selenium Server
.jarfile is located. - Use the following command to start Selenium Server and capture logs:
java -jar selenium-server-standalone.jar -log selenium.logExplanation –
Here’s an explanation of each part of the command:
java: This command is used to run Java applications.-jar: This specifies that you want to run a Java archive (.jar) file.selenium-server-standalone.jar: Replace this with the actual name of your Selenium Server.jarfile. Ensure that the.jarfile is in the same directory.-log: This is the parameter that tells Selenium Server to create a log file.selenium.log: This is the name of the log file where server-side logs will be saved. You can replace it with your preferred filename.
Once you execute this command, Selenium Server will start, and it will log server-side information into the specified log file. You can analyze this log to debug issues in your Selenium tests, monitor browser interactions, or identify errors.
To Learn more, Click here –
Q66) How can you retrieve the message in an alert box?
Answer –
There is a method in Alert interface which gives you the text of the alert box message. As below:
Alert alert = driver.switchTo().alert();
alert.getText();
To Learn more, Click here –
Q67) Which of the following methods is used to maximize the browser window in Selenium?
Answer –
Here is the solution –
// Import the required class from Selenium Library -
import org.openqa.selenium.chrome.ChromeOptions;


// Using WebDriverManager plugin for auto-setup for chrome driver -
WebDriverManager.chromedriver().setup();

ChromeOptions chromeOptions = new ChromeOptions();

// Using Chrome Options to Start browser with maximised window -
chromeOptions.addArguments("start-maximized");

driver = new ChromeDriver(chromeOptions);
Explanation –
What we are doing here is –
- Importing
ChromeOptionsand Setting UpWebDriverManager. - The
WebDriverManagerlibrary is used to automatically download and set up the ChromeDriver executable. This is a convenient way to ensure that the correct ChromeDriver version is used without manually managing driver installations. - An instance of
ChromeOptionsis created to configure the Chrome browser. - In this part, we are telling the Chrome browser to start in a maximized window. The
addArgumentsmethod allows you to pass various command-line arguments to the Chrome browser."start-maximized"is one such argument that maximizes the browser window when Chrome is launched.
To Learn more, Click here –
Q68) How to perform drag and drop operation in Selenium WebDriver?
Answer –
To perform drag and drop, we need to take help of Actions class of Selenium WebDriver library. Here a complete program with multiple solutions / multiple ways on how to perform drag and drop function in Selenium-
package com.logicalduniya.interview.selenium;

/******************************************************************************

                            LogicalDuniya.com
        Program to perform drag and drop operation in Selenium WebDriver
       Copy this program, and run using Java 8 or above to get the results.

*******************************************************************************/

import org.openqa.selenium.By;
import org.openqa.selenium.WebDriver;
import org.openqa.selenium.WebElement;
import org.openqa.selenium.interactions.Actions;


public class DragAndDropBasicTest {

	public static void main(String[] args) throws Exception {

        // Setup of WebDriver -
        System.setProperty("webdriver.chrome.driver", "path_to_chromedriver_in_your_computer");
		WebDriver driver = new ChromeDriver();

		driver.manage().window().maximize();
		driver.get("https://codepen.io/LogicalDuniya/full/oNmNVem");
		driver.switchTo().frame("result");									// switch to available frame..

		WebElement rat = driver.findElement(By.id("rat"));
		WebElement cage = driver.findElement(By.id("cage"));

		Actions actions = new Actions(driver);
		actions.dragAndDrop(rat, cage)
			.release(cage).build().perform();


//		Way 1 :-
//		actions.clickAndHold(rat)
//		.moveToElement(cage)
//		.release()
//		.build().perform();

//		Way 2 :-
//		actions.dragAndDrop(rat, cage)
//			.build().perform();

//		Way 3 :-
//		actions.clickAndHold(rat)
//		.moveToElement(rat, cage.getLocation().x, cage.getLocation().y)
//		.release(cage)
//		.build().perform();

		// Wait before Quitting the browser in @AfterTest..
		Thread.sleep(2000);

		SeleniumHelperUtil.log("Rat has been put inside the Cage..");
		driver.close();
		driver.quit();
	}
}
To Learn more, Click here –
Q69) How to handle certificates using Selenium?
Answer –
To handle SSL certificates in Selenium, we need to set the ChromeOptions instance with “ignore-certificate-errors” and setAcceptInsecureCerts() method while working with Chrome Browser and Java.
ChromeOptions chromeOptions = new ChromeOptions();

chromeOptions.addArguments("--ignore-certificate-errors");
chromeOptions.setAcceptInsecureCerts(true);

driver = new ChromeDriver(chromeOptions);
To Learn more, Click here –
Selenium Interview Questions and Answers – For Experts🔺
In this section, we will focus on more complex and advanced Selenium Interview Questions and Answers for Expert candidates. We have also tried to provide enough details with learn more link to the Selenium guide. So let’s get started from the very first Selenium Interview Questions for Experts candidates having 8+ years experience with Selenium Framework –
Q70) How to wait until page is completely loaded?
Answer –
There are multiple solutions of this problem-
1. Use of Implicit Wait –
Set implicit wait immediately after creating the web driver instance:
driver.manage().timeouts().implicitlyWait(Duration.ofSeconds(30));But, the above solution is not very efficient. The behaviour of implicit wait is not clear, not properly documented and most of the time it does not work as expected.
2. Use JavascriptExecutor to check web document’s ready state:
new WebDriverWait(chromeDriver, pageLoadTimeout).until(
    webDriver -> ((JavascriptExecutor) webDriver).executeScript("return document.readyState").equals("complete")
);
The above solution gives us ability to call JavaScript return document.readyState until "complete" is returned. The web driver instance can serve as JavaScript executor.
3. Use ExpectedConditions class :
Selenium WebDriver allows for waiting for specific conditions until a defined task is complete. In our case of waiting till page load, we can use the ExpectedConditions class :
Let’s say, after the page load, you want to click on the login button, then you need to write the script like –
WebDriverWait wait = new WebDriverWait(driver, Duration.ofSeconds(30));
wait.until(ExpectedConditions.elementToBeClickable(By.id("YourLoginButtonIdValue")));
To Learn more, Click here –
Q71) What are the ways. to verify if an element is present or not using Selenium WebDriver?
Answer –
There are multiple ways to check the presence of an element on a webpage. Let’s say, we want to click on the login button as the page get’s loaded.
Method 1 : Using ExpectedConditions
So, the first option to check the element’s presence is to use Selenium class – ExpectedConditions. This method is most optimal way to check the presence of element.
WebDriverWait wait = new WebDriverWait( driver, Duration.ofSeconds(timeoutSeconds) );
wait.ignoring(NoSuchElementException.class);
wait.until( ExpectedConditions.presenceOfElementLocated( By.xpath("login-btn-xpath")) );
driver.findElement( By.xpath("login-btn") );
Method 2 : Using try - catch
private boolean existsElement(String id)
{
    try {
        driver.findElement(By.id("login-btn-id"));
    } catch (NoSuchElementException e) {
        return false;
    }
    return true;
}
This would be quite easy and does the job.
You could even go further and take a By elementLocator as a parameter in place of String id, eliminating problems if you want to find the element by something other than an id.
Method 3 : Using findElements(..)
Use findElements() instead of findElement().
findElements() will return an empty list if no matching elements are found instead of an exception.
To check that an element is present, you could try this
Boolean isPresent = driver.findElements(By.yourLocator).size() > 0;But, there is a disadvantage with this solution. This will add a lot of time as it takes to run your tests.
To Learn more, Click here –
Q72) What are the different types of waits that WebDriver supports?
Answer –
Upto Selenium 4, there are majorly 2 types of waits available to implement –
- Implicit Wait
- Explicit Wait
Further more, these waits are having a few varieties in itself –
| Implicit Wait | Explicit Wait |
| Implicit Wait Timeout | WebDriverWait |
| Page Load Timeout | Fluent Wait |
| Script Timeout |
1.1 : Implicit Wait Timeout
This specifies the time to wait for the implicit element location strategy when locating elements. The default timeout 0 is imposed when a new session is created by WebDriver.
Implicit waits are used to set a default waiting time for all elements on the page. If the WebDriver can’t find an element immediately, it will wait for the specified amount of time before throwing an exception.
WebDriver driver = new ChromeDriver();

// Calling the Implicit Wait - Setting implicit wait to 10 seconds
driver.manage().timeouts().implicitlyWait(10, TimeUnit.SECONDS);

driver.get("https://example.com");

// WebDriver will wait for up to 10 seconds to find the element
WebElement element = driver.findElement(By.id("myElement"));
1.2 : Page Load Timeout:
Page load timeouts specifies the time interval in which web page needs to be loaded in a current browsing context. The default timeout 300,000 is imposed when a new session is created by WebDriver. If page load limits a given/default time frame, the script will be stopped by an Exception – TimeoutException.
The Page Load Timeout sets the maximum amount of time the WebDriver will wait for a page to load completely.
WebDriver driver = new ChromeDriver();

// Set page load timeout to 30 seconds -
driver.manage().timeouts().pageLoadTimeout(30, TimeUnit.SECONDS);

// WebDriver will wait for up to 30 seconds for the page to load -
driver.get("https://example.com");
1.3 : Script Timeout:
Script Timeouts define the maximum time a script is allowed to run. This method specifies when to interrupt an executing script in a current browsing context. The default timeout 30,000 is imposed when a new session is created by WebDriver.
WebDriver driver = new ChromeDriver();

// Set script timeout to 20 seconds -
driver.manage().timeouts().setScriptTimeout(20, TimeUnit.SECONDS);

// WebDriver will wait for up to 20 seconds for the script to complete -
((JavascriptExecutor) driver).executeAsyncScript("someLongRunningScript();");
The above 3 timeout methods fall under Implicit Wait. The below 2 methods are kind of Explicit Wait.
2.1 : WebDriverWait:
WebDriverWait allows you to wait for a specific condition to be met.
WebDriverWait is applied on certain element with defined expected condition and time. This wait is only applied to the specified element. This wait can also throw exception when element is not found.
Below is an example, we’re waiting for an element to be clickable.
// Wait for up to 10 seconds
WebDriverWait wait = new WebDriverWait(driver, 10);

// Wait for the element to be clickable
WebElement element = wait.until(ExpectedConditions.elementToBeClickable(By.id("myElement")));
2.2 : FluentWait:
The easiest way to customize Waits in Java is to use the FluentWait class. FluentWait is a more flexible form of waiting that lets you customize various aspects of the wait, like polling intervals and exceptions to ignore. This example waits for an element with a custom condition.
FluentWait<WebDriver> wait = new FluentWait<>(driver)
    .withTimeout(Duration.ofSeconds(20))     // Maximum wait time
    .pollingEvery(Duration.ofMillis(500))    // Polling interval
    .ignoring(NoSuchElementException.class); // Ignore this exception

WebElement element = wait.until(webDriver -> {
    WebElement el = webDriver.findElement(By.id("myElement"));
    if (el.isDisplayed()) {
        return el;
    } else {
        return null;
    }
});
These are basic examples to illustrate the use of different wait types. In real-world scenarios, you would typically use these waits to handle various synchronisation issues in your automation scripts.
To Learn more, Click here –
Q73) How to perform double click in Selenium WebDriver?
Answer –
To perform a double click in Selenium WebDriver, you can use the Actions class to simulate a double click action. Here’s an example of how to do this:
Selenium Example –
/******************************************************************************

                            LogicalDuniya.com
              Program to perform double click in Selenium WebDriver
       Copy this program, and run using Java 8 or above to get the results.

*******************************************************************************/

import org.openqa.selenium.By;
import org.openqa.selenium.WebDriver;
import org.openqa.selenium.WebElement;
import org.openqa.selenium.chrome.ChromeDriver;
import org.openqa.selenium.interactions.Actions;

public class DoubleClickExample {

    public static void main(String[] args) {

        // Set the path to the ChromeDriver executable
        System.setProperty("webdriver.chrome.driver", "path/to/chromedriver.exe");

        // Initialize the ChromeDriver
        WebDriver driver = new ChromeDriver();

        // Open a web page
        driver.get("https://example.com");

        // Find the element to double click (you can change the locator as needed)
        WebElement element = driver.findElement(By.id("myElement"));

        // Create an Actions object
        Actions actions = new Actions(driver);

        // Perform a double click on the element
        actions.doubleClick(element).perform();

        // Close the browser
        driver.quit();
    }
}
To Learn more, Click here –
Q74) Is there a way to simulate a browser ‘back’ button click in Selenium?
Answer –
Yes. You can simulate the browser ‘back’ button click in Selenium using the navigate().back() method. This method will navigate back to the previous page in the browser history.
Example –
driver.get("https://selenium.dev");
// OR, use below command to go to a page -
driver.navigate().to("https://selenium.dev");

// Going back to previously opened page -
driver.navigate().back();
To Learn more, Click here –
Q75) What are different Driver class for different browsers in Selenium 4?
Answer –
In Selenium, different browsers require different driver classes for automation. Below are the driver classes used for some popular web browsers:
- Chrome: To automate the Chrome browser, you use
ChromeDriver. Import it like this:
import org.openqa.selenium.chrome.ChromeDriver;- Firefox: For Mozilla Firefox, you use
FirefoxDriver. Import it like this:
import org.openqa.selenium.firefox.FirefoxDriver;- Edge: For Microsoft Edge, you use
EdgeDriver. Import it like this:
import org.openqa.selenium.edge.EdgeDriver;- Safari: Safari automation is done using
SafariDriver. Import it like this:
import org.openqa.selenium.safari.SafariDriver;- Internet Explorer (IE): For Internet Explorer, you use
InternetExplorerDriver. Import it like this:
import org.openqa.selenium.ie.InternetExplorerDriver;- Opera: Opera browser automation is done using
OperaDriver. Import it like this:
import org.openqa.selenium.opera.OperaDriver;Each of these driver classes corresponds to a specific web browser. You’ll need to use the appropriate driver class for the browser you want to automate. Additionally, you may need to set the system property to the location of the driver executable for the chosen browser, which can be done using the System.setProperty method.
System.setProperty("webdriver.chrome.driver", "path/to/chromeDriverBinaryFile");To Learn more, Click here –
Q76) Explain the difference between assert and verify commands.?
Answer –
In Selenium, “assert” and “verify” are two different types of commands used in testing frameworks like TestNG or JUnit to validate and check the expected conditions in your test scripts
Assert –
The assert command is used to check if the given condition is true or not. If the condition is true, then the execution of the program will continue. If the condition is false, then the execution of the program will stop.
It’s typically used when you want to check a critical condition in your test. If the condition isn’t met, there’s no point in continuing the test.
Assert.assertEquals(actualResult, expectedResult, "The results do not match.");Verify –
The verify command is used to check if the given condition is true or not. If the condition is true, then the execution of the program will continue. If the condition is false, then the execution of the program will not stop, but an error message will be displayed.
It’s used when you want to validate non-critical conditions that, if they fail, shouldn’t prevent the whole test from continuing.
if (actualResult.equals(expectedResult)) {
    // Continue the test
} else {
    // Log an error or warning, but don't stop the test
}
To Learn more, Click here –
Q77) List out some of the automation tools which could be integrated with Selenium to achieve continuous testing.?
Answer –
Some of the automation tools which could be integrated with Selenium to achieve continuous testing are:
- Jenkins
- Travis CI
- CircleCI
- AWS CodePipeline
- Azure DevOps
- Bitbucket Pipelines
To Learn more, Click here –
Q78) What is Page Object Model and Page Factory in Selenium?
Answer –
The Page Object Model (POM) and Page Factory are design patterns used in Selenium to create more efficient and maintainable automation test cases. They help in improving test code readability, reusability, and maintainability by abstracting the web page and its elements into separate classes.
Here’s how it it achieved :
Page Object Model (POM):
POM, the Page Object Model helps to reduce code duplication of code and improves test case maintenance.
In Page Object Model, you can consider each web page of an application as a class file. Each class file will contain only corresponding web page elements. Using these elements, automation testers can perform operations on the website which simplifies the complexity as well.
Ker Advantages of POM :
- Readability and Reliability of Scripts:
When all webpages have independent files, one can quickly identify actions performed on a particular webpage by navigating through that file.
If a change must be made to a specific code section, it can be efficiently done without affecting other files. - Easy Maintenance:
POM is super useful when there is a change in a UI element or a change in action. An example would be: a list radio buttons get changes into checkboxes.
In this case, POM helps to identify the page or screen to be modified. As every webpage will have different Java files, this identification is necessary to make changes in the right files. This makes test cases easy to maintain and reduces errors. - Code Reusability:
As already discussed, all webpages are independent. By using POM, one can use the test code for one screen, and reuse it in another test case. There is no need to rewrite code, that’s how it dows save time and efforts.
Key components of the Page Object Model:
- Page Classes: Each web page is represented by a separate class, commonly referred to as a “page class.” These classes contain methods that define the interactions with the page elements.
- Element Locators: The page classes include element locators (e.g., XPath, CSS, or ID) to identify and interact with specific elements on the page.
- Page Methods: The page classes contain methods that perform actions on or retrieve information from the elements of the page. These methods should be descriptive and reusable.
- Test Scripts: The test scripts are separate from the page classes. They use the methods defined in the page classes to interact with the web application.
To Learn more, Click here –
Q79) How do you write a locator to identify paragraph elements that are the immediate child of a div element, or the descendent of a div element?
Answer –
Immediate child:
An immediate child in XPath is defined indicated using “/”, while on CSS, it is indicated using “>”. For example, with XPath:
//div/pand with CSS:
div > pDescendent:
To find paragraph elements that are descendent to any div element (i.e. the paragraph element appears in the subtree rooted at the div element), we can use “//” in XPath, and just a whitespace in CSS:
//div//pdiv p
To Learn more, Click here –
Q80) How to run Chrome in headless mode using Selenium? What are the benefit of using Headless Drivers?
Answers –
Headless mode is basically an approach to launch browser in console mode. The user interface of browsers will not be visible on the screen but, the Selenium test script would able to perform all the tasks, such as clicking on buttons, links, inputting text etc.
To run Chrome in Headless, we can use the ChromeOptions class, configure it with proper parameters for headless mode and than create a ChromeDriver object to launch browser without any UI.
Selenium Example with Java :
ChromeOptions chromeOptions = new ChromeOptions();

chromeOptions.addArguments("--headless");

WebDriver driver = new ChromeDriver(chromeOptions);
Note 💡
If you are working with a website, which is not hosted on any Web Server / Hosting platform, and currently running in your local system usinglocalhost, then to launch the URL, usehttp://as a prefix. Such as –driver.get("http://localhost:....");
One of the major benefit of using headless mode for automation testing is to fasten the process. If you run a test script in headless mode, and run same test script in non-headless mode, the headless mode will take lesser time to complete the execution.
To Learn more, Click here –
Q81) How will you verify the Webpage Title and URL using Selenium?
Answer –
To verify title, we can use getTitle() method, and to verify the current page URL, we can use getCurrentUrl() method. Here is an example-
String title = driver.getTitle();
System.out.println("Title = " + title);

String url = driver.getCurrentUrl();
System.out.println("URL = " + url);
To Learn more, Click here –
Q82) How you refresh the webpage using Selenium? Is there any way to go to last visited webpage?
Answer –
To refresh the webpage, we can take help of navigate().refresh() method and to go back, we can use navigate().back() method –
driver.get("https://logicalduniya.com");

driver.get("https://logicalduniya.com/interview-questions);

driver.navigate().back();
// After execution of above statement, you will reach back to the "https://logicalduniya.com".
To Learn more, Click here –
Q83) How would save cookies of a currently opened webpage?
Answer –
Using getCookies() method, we can get all the cookies currently available and then, we can save the cookies. Here’s an example –
package com.logicalduniya.interview.selenium;

/******************************************************************************

                            LogicalDuniya.com
              Program to save cookies of a currently opened webpage
       Copy this program, and run using Java 8 or above to get the results.

*******************************************************************************/

import org.openqa.selenium.*;
import org.openqa.selenium.chrome.ChromeDriver;
import java.util.Set;

public class GetAllCookiesTest {

    public static void main(String[] args) {

        // Setup of WebDriver -
        System.setProperty("webdriver.chrome.driver", "path_to_chromedriver_in_your_computer")
        WebDriver driver = new ChromeDriver();

        try {
            driver.get("http://www.logicalduniya.com");

            // Get all available cookies
            Set<Cookie> allCookies = driver.manage().getCookies();
            System.out.println(cookies);

        } finally {
            driver.quit();
        }
    }
}
To Learn more, Click here –
Q84) How would you handle multiple tabs of a browser window in Selenium? Is there any way to create a new Tab or Window in a browser using Selenium?
Answer –
To handle single and multiple windows in Selenium, there a couple of method available for us. Using web driver object, we can call these functions and work handle multiple windows very easily.
driver.getWindowHandle():
This function is used to retrieve the current window’s id. This function returns the current window id in String format.driver.getWindowHandles():
This function is useful for retrieving the ids of all the windows that are currently opened. This function returns list of window ids in Set of String format.
To get values from this Set, we need to use the Iterator interface. We can also convert this Set to List and easily fetch its values.
// Store the current window handle -
String winHandleBefore = driver.getWindowHandle();

// Perform the click operation that opens new window -

// Switch to recently opened browser window -
List<String> windowsList = new ArrayList<String>(driver.getWindowHandles());
driver.switchTo().window( windowsList.get(windowsList.size()-1 ));


// Perform the actions on new window -

// Close the new window, if that window no more required -
driver.close();

// Switch back to original browser (first window) -
driver.switchTo().window(winHandleBefore);

// Continue with original browser (first window) -
// ...
To create a new browser window, yes we can do that in Selenium 4 and above versions. Here is how to do it-
// Opens a new tab and switches to new tab
driver.switchTo().newWindow(WindowType.TAB);

// Opens a new window and switches to new window
driver.switchTo().newWindow(WindowType.WINDOW);
To close a window, and go back to original window, we need to do this –
//Close the tab or window
driver.close();

//Switch back to the old tab or window
driver.switchTo().window(originalWindow);
To Learn more, Click here –
Q85) Write Selenium test script to scroll at the footer element of webpage, whose id=’footer’, and take a screenshot of the screen?
Answer –
Here is the solution Selenium Test Script for the above scenario –
// Scrolls to the footer element..
WebElement iframe = driver.findElement(By.id("footer"));
new Actions(driver)
	.scrollToElement(iframe)
	.perform();

// Target Screenshot file..
File srcSSFile = ((TakesScreenshot) driver).getScreenshotAs(OutputType.FILE);

FileUtils.copyFile(
	srcSSFile,
	new File(ssFinalFilePath)
);
To Learn more, Click here –
Q86) How does FluentWait work in Selenium?
Answer –
FluentWait is a variety of Explicit Waits in Selenium. We generally use FluentWait commands when we have web elements which sometimes visible in few seconds and some times take more time than usual time. This happens mainly in AJAX applications (AJAX = Asynchronous JavaScript and XML).
If we breakdown the implementation of FluentWait, then we need to take care of 5 key steps while working with FluentWait –
- Pass the
WebDriverobject while creating FluentWait. - Set the
Timeout, if required. This defines the maximum amount of time to wait for a condition. - Set the
Frequency, if required. The frequency helps to check the condition after every specified time. - Configure the wait to ignore specific types of exceptions while waiting, such as
NoSuchElementExceptionswhen searching for an element on the page.
We can set the default pooling period based on our requirement. We could ignore any exception while polling an element. - Set the condition on which the wait will apply.
Now, Let’s understand FluentWait more deeply with a simple example –
// Creating and configurating the FluentWait object -
Wait<WebDriver> wait = new FluentWait<>(driver)
	.withTimeout(60, TimeUnit.SECONDS)
	.pollingEvery(5, TimeUnit.SECONDS)
	.ignoring(NoSuchElementException.class);


// Configuring the condition, on which the wait will apply -
wait.until(new com.google.common.base.Function<WebDriver, Boolean>()
{
	@Override
	public Boolean apply(WebDriver driver) {
		Boolean status = false;
		// Your condition, which results into true/false and updates 'status'
	    return status;
	}
});
To Learn more, Click here –
Q87) Write a Selenium Script to pick multiple options from a Dropdown?
Answer –
The Select class is a Selenium WebDriver class, which provides the implementation of the HTML SELECT tag. It exposes several “Select By” and “Deselect By” methods in <strong>Select</strong> class. We can use these methods to select or deselect options in the drop down list or multi select object. The Select class is the part of the selenium package.
Here is sample Selenium Script to pick multiple option from a Select element –
package com.logicalduniya.interview.selenium;

/******************************************************************************

                           [ LogicalDuniya.com ]
               Program to pick multiple options from a Dropdown
       Copy this program, and run using Java 8 or above to get the results.

*******************************************************************************/

import org.openqa.selenium.By;
import org.openqa.selenium.WebDriver;
import org.openqa.selenium.WebElement;
import org.openqa.selenium.chrome.ChromeDriver;
import org.openqa.selenium.support.ui.Select;

public class MultiSelectDemoTest {

    public static void main(String[] args) {

        // Set the path to the ChromeDriver executable
        System.setProperty("webdriver.chrome.driver", "path/to/chromedriver");

        // Initialize the WebDriver
        WebDriver driver = new ChromeDriver();

        // Navigate to the web page
        driver.get("https://example.com");

        // Locate the 'select' element by its id
        WebElement selectElement = driver.findElement(By.id("fruits"));

        // Create a Select object to work with the 'select' element
        Select fruitsSelect = new Select(selectElement);

        // Select multiple options by visible text
        fruitsSelect.selectByVisibleText("Apple");
        fruitsSelect.selectByVisibleText("Banana");

        // Alternatively, you can select options by index
        // fruitsSelect.selectByIndex(0); // Select the first option
        // fruitsSelect.selectByIndex(1); // Select the second option

        // To deselect options:
        // fruitsSelect.deselectByVisibleText("Apple");
        // fruitsSelect.deselectByIndex(0);

        // You can also use the following methods to deselect all selected options:
        // fruitsSelect.deselectAll();

        // Close the browser
        driver.quit();
    }
}
To Learn more, Click here –
Q88) How can you check the visibility of web elements (if an element is displayed on the screen)?
Answer –
There are various commands available in WebDriver implementation classes, using which we can verify the visibility of WebElements. Here are the details –
- isDisplayed()
Usage –boolean isButtonDisplayed = driver.findElement(By.id(“login-btn”)).isDisplayed();
There are a few other methods available for slightly different use –
- isSelected()
Usage –boolean isButtonSelected = driver.findElement(By.id(“login-btn”)).isSelected(); - isEnabled()
Usage –boolean isButtonEnabled = driver.findElement(By.id(“login-btn”)).isEnabled();
To Learn more, Click here –
Q89) Mention what are the various types of framework available to develop Regression Suites?
Answer –
There are number of frameworks have been emerged in past 5-10 years. Some of them are –
- Data-Driven Testing Framework
- Keyword Driven Testing Framework
- Hybrid Testing Framework
- Module Based Testing Framework
- Library Architecture Testing Framework
- Behavior Driven Development Framework
Most Common Frameworks are :
- Data-Driven Testing Framework
- Hybrid Testing Framework
- Keyword Driven Testing Framework
To Learn more, Click here –
Q90) How to get mouseover text in Selenium WebDriver Java?
Answer –
The mouseover text or tooltip text the text that we see when we hover over the mouse cursor to a particular web element. It shows the text because of a ‘title‘ attribute. We take help of action class to get the tooltip. Here’s a complete example to get the tooltip of a image element –
package com.logicalduniya.interview.selenium;

/******************************************************************************

                            LogicalDuniya.com
           Program to get mouseover text in Selenium WebDriver Java
       Copy this program, and run using Java 8 or above to get the results

*******************************************************************************/

import org.openqa.selenium.By;
import org.openqa.selenium.WebDriver;
import org.openqa.selenium.WebElement;
import org.openqa.selenium.chrome.ChromeDriver;
import org.openqa.selenium.chrome.ChromeOptions;
import org.openqa.selenium.interactions.Actions;


/**
    @author Shubham Srivastav
    Description : A simple Test Script to Get MouseOver text using Selenium WebDriver and Java.
*/
class FindMouseoverText {

	private static WebDriver driver;

	public static void main(String[] args) throws Exception {

		setup();

        System.out.println("---- WebDriver Setup is Completed !!");

        mouseOverTooltipTextReadTest();

		System.out.println("---- Mouseover text in Selenium WebDriver+Java Test is completed successfully !!");

	}

	public static void setup() {

		System.setProperty("webdriver.chrome.driver",
			"/Users/logical_duniya_com/Desktop/OtherFiles/ChromeDriver/chromedriver_mac");

		ChromeOptions chromeOptions = new ChromeOptions();
		chromeOptions.addArguments("start-maximized"); 			// open Browser in maximized mode
		chromeOptions.addArguments("disable-infobars"); 		// disabling infobars
		chromeOptions.addArguments("--ignore-certificate-errors");
		chromeOptions.addArguments("--remote-allow-origins=*");
		chromeOptions.setAcceptInsecureCerts(true);				// AcceptInsecureCerts

		driver = new ChromeDriver(chromeOptions);
	}


	public static void mouseOverTooltipTextReadTest() throws Exception {

		driver.get("https://codepen.io/shubh-sri/full/PoxBVvg?src=LogicalDuniya.com");
		driver.switchTo().frame("result");

		 // Locate the image element
        WebElement imageElement = driver.findElement(By.xpath("//div[@class='imgbox']/img"));

        // Perform a mouseover (hover) action on the image
        performMouseover(driver, imageElement);

        // Get the tooltip text
        String tooltipText = getTooltipText(driver);

        // Print the tooltip text
        System.out.println("Tooltip Text is: " + tooltipText);

        // Close the browser
        driver.quit();

	}


	private static void performMouseover(WebDriver driver, WebElement element) {
		Actions actions = new Actions(driver);
		actions.moveToElement(element).perform();
    }

	private static String getTooltipText(WebDriver driver) {
        WebElement tooltipElement = driver.findElement(By.xpath("//div[@class='imgbox']/img"));
        return tooltipElement.getAttribute("title");
    }
}
Console Output :
---- WebDriver Setup is Completed !!
Tooltip Text is: This will be displayed as a tooltip to - LogicalDuniya.com
---- Mouse Over Click Test is Done Successfully !!
Automated Chrome Browser Output :
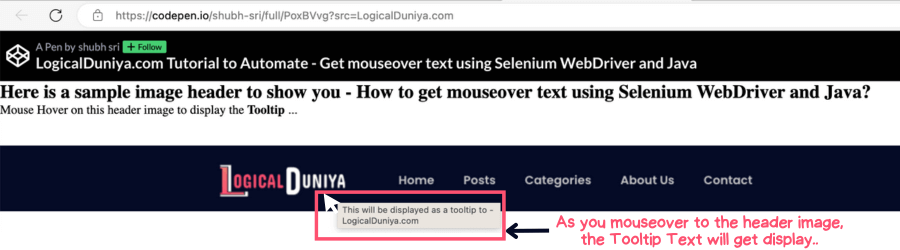
To Learn more, Click here –
Q91) If a webpage has below HTML elements, then How would you find the 1, 2 and 3rd div element using Selenium WebDriver and XPath?
<div class="value test"></div><div class="value test "></div><div class="first value test last"></div><div class="test value"></div>
Answer –
To match 1, 2 and 3rd div elements, we can take help of contains() method of XPath. We need to match class contains value test. Remember, we need to maintain the order, because class order matters –
List<WebElement> listDivs =
    driver.findElements(By.xpath("//div[contains(@class, 'value test')]"));
Some other scenarios –
To match only 1st div element, we can go for exact match using equal to ‘=‘ operator –
WebElement div1 =
    driver.findElement(By.xpath("//div[@class='value test']"));
To match 1, 2, 3 and 4 div elements, we need to try to match as long as elements have class value and test –
List<WebElement> listDivs =
    driver.findElements(By.xpath("//div[contains(@class, 'value') and contains(@class, 'test')]"));
To Learn more, Click here –
Q92) How to Upload a File using Selenium WebDriver?
Answer –
Uploading files using Selenium WebDriver can be done by simply using the sendKeys() method on the file-select input field to enter the path to the file to be uploaded.
package com.logicalduniya.interview.selenium;
/******************************************************************************

                            LogicalDuniya.com
           Program to Upload a File using Selenium WebDriver?
       Copy this program, and run using Java 8 or above to get the results.

*******************************************************************************/
import org.openqa.selenium.*;
import org.openqa.selenium.firefox.FirefoxDriver;

public class FileUploadTest {

    public static void main(String[] args) {

        // Set the driver path
        System.setProperty("webdriver.gecko.driver","C:\\geckodriver.exe");

        String baseUrl = "https://your_example.com/test/upload/";
        WebDriver driver = new FirefoxDriver();

        driver.get(baseUrl);
        WebElement uploadElement = driver.findElement(By.id("uploadfile_0"));

        // Provide the file path onto the file-selection input field
        uploadElement.sendKeys("C:\\newFile.html");

        // click the "UploadFile" button
        driver.findElement(By.name("send")).click();
    }
}
To Learn more, Click here –
Q93) How to Do Cross Browser Testing using Selenium?
Answer –
If we are using Selenium WebDriver, we can automate test cases using Internet Explorer, FireFox, Chrome, Safari browsers.
To execute test cases with different browsers in the same machine at the same time we can take help of another framework – TestNG with the Selenium WebDriver.
Using TestNG, we can generate a efficient and detailed reports, and we can easily come to know how many test cases are passed, failed, and skipped. We can execute the failed test cases separately.
If we implement the cross browser Testing, then the we need to include out Java Test Class in the testing.xml , which will look something like that –
TestNG.xml –
<?xml version="1.0" encoding="UTF-8" ?>
<!DOCTYPE suite SYSTEM "http://testng.org/testng-1.0.dtd">

<suite name="TestSuite" thread-count="2" parallel="tests">

  <test name="App Login Test : Chrome">
    <parameter name="browser" value="chrome" />
    <classes>
      <class name="com.logicalduniya.parallelTest.AppLoginTest" />
    </classes>
  </test>

  <test name="App Login Test : Firefox">
    <parameter name="browser" value="firefox" />
    <classes>
      <class name="com.logicalduniya.parallelTest.AppLoginTest" />
    </classes>
  </test>

</suite>
Explanation of TestNG XML –
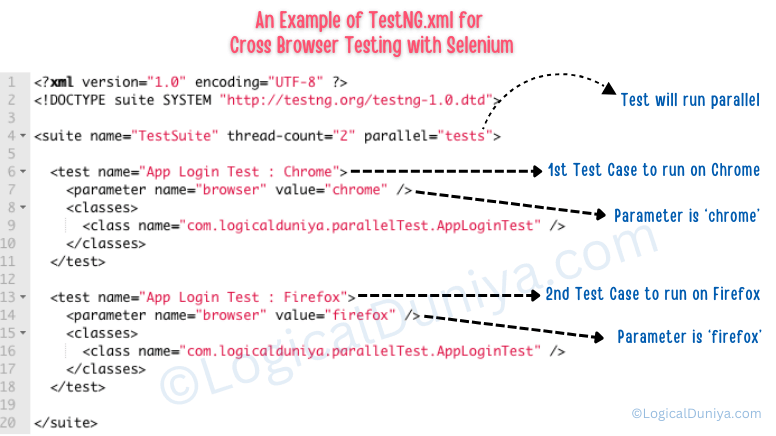
If you will notice we have mentioned a Test Class path ‘com.logicalduniya.parallelTest.AppLoginTest‘ in the above TestNG.xml file. As we execute this TestNG.xml file using TestNG plugin, our Test Script written in that Test Class ‘AppLoginTest‘ will be executed. Here’s how will our test class receive the parameters passed from TestNG xml line no. 7 and 14 :
Selenium Test Class :
public class CrossBrowserLoginTest {

    @BeforeTest
    @Parameters("browser")               // Taking parameter value from TestNG.xml -
    public void preSetup(String browser) throws Exception {   // Value will be stored in 'browser'

        if (browser.equalsIgnoreCase("chrome")) {
          driver = new ChromeDriver();
        }
        else if (browser.equalsIgnoreCase("firefox")) {
          driver = new FirefoxDriver();
        }
    }

    @Test
    public void loginTest(){
        // Some code..
    }
}
To Learn more, Click here –
Q94) What is the use of JavascriptExecutor? Give an example.
Answer –
In Selenium WebDriver, there are locators like XPath, CSS, etc., which are used to identify and perform operations on any web page.
In case, these locators do not work, then we have another option to use JavascriptExecutor for that. We can use JavascriptExecutor to perform any desired operation on a web element of any webpage.
Selenium supports JavascriptExecutor. To work with this, we need not to download any extra plugin or add-on. We just need to import an interface org.openqa.selenium.JavascriptExecutor in our script as to call method on a JavascriptExecutor implementation object.
Example 1 – To Click an Element using JavascripExecutor in Selenium
        WebDriver driver= new FirefoxDriver();

        // Creating the JavascriptExecutor interface object by Type casting driver object-
        JavascriptExecutor js = (JavascriptExecutor) driver;

        // Launching the Site.
        driver.get("https://some-example.com/logicalDuniya");

        WebElement button = driver.findElement(By.name("btnLogin"));

        // Perform Click on LOGIN button using JavascriptExecutor-
        js.executeScript("arguments[0].click();", button);
To Learn more, Click here –
Q95) Explain the reason for any 3 Selenium Exceptions why do they happen?
Answer –
In Selenium, we get different types of exceptions for different – different reasons. Some of the exception are with their general reasons to occur –
- ElementNotVisibleException:
This type of Selenium exception occurs when an existing element in DOM has a feature set as hidden. - ElementNotSelectableException:
This Selenium exception occurs when an element is presented in the DOM, but you can be able to select. Therefore, it is not possible to interact. - NoSuchElementException:
This Exception occurs if an element could not be found. - NoSuchFrameException:
This Exception occurs if the frame target to be switched to does not exist. - NoAlertPresentException:
This Exception occurs when you switch to no presented alert.
Note 💡
If the interviewer asks – How do you handle the runtime exceptions in Selenium WebDriver with Java, then you can answer – ‘Using try-catch mechanism’. Must check this LogicalDuniya guide on How to use try-catch in Java to Handle Exception efficiently?
To Learn more, Click here –
Q96) What is ChromeOptions Class? Why to use ChromeOptions?
Answer –
ChromeOptions class –
- To manipulate various properties of the ChromeDriver, we take help of
ChromeOptionsclass.
- The
ChromeOptionsclass is generally used in combination with DesiredCapabilities for customizing ChromeDriver object sessions. - To work with
ChromeOptionsclass, we need to import it. In Java, we need to useorg.openqa.selenium.chrome.ChromeOptions;
Usage of ChromeOptions class –
During Selenium tests execution, If we want to open the Chrome browser in maximized mode, then we can use ChromeOptions class object to configure the ChromeDriver object. To do that, we need to pass an instance of ChromeOptions class to the web driver object at the time of it’s initialization.
// LogicalDuniya.com -

ChromeOptions options = new ChromeOptions()        // Creating ChromeOptions instance
options.addArgument("start-maximized");            // Configuring it
ChromeDriver driver = new ChromeDriver(options);   // Passing ChromeOptions during ChromeDriver initialization
Other usage of ChromeOptions –
Below are the list of available and most commonly used arguments for ChromeOptions class
- incognito: Opens Chrome in incognito mode
- start-maximized: Opens Chrome in maximize mode
- disable-extensions: Disables existing extensions on Chrome browser
- headless: Opens Chrome in headless mode
- disable-popup-blocking: Disables pop-ups displayed on Chrome browser
- make-default-browser: Makes Chrome default browser
- version: Prints chrome browser version
- disable-infobars: Prevents Chrome from displaying the notification ‘Chrome is being controlled by automated software.
To Learn more, Click here –
Q97) How to get first selected option using Selenium WebDriver and Java?
Answer –
We can get the text using getText() for the option element we get using getFirstSelectedOption(). Here is a sample example –
// Find the dropdown element and create a Select object -
Select select = new Select(driver.findElement(By.xpath("//select")));

// Get the first selected option -
WebElement option = select.getFirstSelectedOption();

// Get the Text of the option -
String defaultItem = option.getText();
System.out.println(defaultItem );
To Learn more, Click here –
Q98) How to test a website on a tablet device using Selenium WebDriver?
Answer –
Selenium provides a direct command to maximize, minimize and customize the browser window as per the requirement. If we want to set the browser window as per any other device, then we just need the device’s viewport width and height and we can use the following Selenium command to set the browser window –
int tabletViewportWidth = 800;
int tabletViewportHeight = 600;

// Create the Dimension object -
Dimension dimension = new Dimension(tabletViewportWidth, tabletViewportHeight);

// Set the browser window size as per the given tablet device dimension -
driver.manage().window().setSize(dimension);
To Learn more, Click here –
Q99) On a webpage, if a modal get opened, which can only be closed by keyboard’s Escape key, then how would you close that modal using Escape key in Selenium?
Answer –
We will be using the Keys enum provided by Selenium WebDriver for all the non-text keys. Here is a sample example –
WebElement modalBox = driver.findElement(By.id("idOfModalElement"));
textbox.sendKeys(Keys.ESCAPE);
To Learn more, Click here –
Q100) How would you fix the error = ‘Element is not clickable at point (x, y) co-ordinates’?
Answer –
Sometimes we see this Selenium WebDriver exception –
WebDriverException: Element is not clickable at point (x, y). Other element would receive the click.To fix this exception, there are a couple of solutions which we can try –
1. Element not getting clicked due to JavaScript or AJAX calls present
We can try to use Actions Class:
WebElement buttonElement = driver.findElement(By.id("loginButtonID"));

Actions actions = new Actions(driver);

actions.moveToElement(buttonElement).click().build().perform();
2. Element not getting clicked as it is not within Viewport
We can try to use JavascriptExecutor to bring the element within the Viewport:
WebElement myElement = driver.findElement(By.id("loginButtonID"));

JavascriptExecutor jse = (JavascriptExecutor)driver;

jse.executeScript("arguments[0].scrollIntoView()", myElement);
3. Element is present in the DOM but not clickable
We can try to ExplicitWait with ExpectedConditions set to elementToBeClickable() for the element to be clickable:
WebDriverWait wait = new WebDriverWait(driver, 10);

wait.until( ExpectedConditions.elementToBeClickable(By.id("navigationPageButton")) );
To Learn more, Click here –
Q101) How to use XPath Axes in Selenium?
Answer –
By using XPath axes, we can easily find the dynamic and very complex elements on a web page. XPath axes contain several functions to find an element.
The common syntax is to use as = //xpath-body//AxesFunctionName::TagName
A few functions are –
following
This function ‘following‘ will return the immediate element of the particular component.
Example:
XPath = //*[@type='text']//following::input
preceding
This function ‘preceding‘ will return the preceding element of the particular element.
Example:
XPath = //*[@type='submit']//preceding::input
descendant
This function ‘descendant‘ will return the descendant element of the particular element.
Example:
XPath = //*[@id='rt-feature']//descendant::a
To Learn more, Click here –
Conclusion
In this in-depth Selenium guide, we have learnt 101 Latest Selenium Interview Questions and Answers for 2023 with step by step solutions. In the below comments section, I would love to know from you – What Selenium Interview Questions have been asked from you during your interview. Also, let us know, if you need answer of any other Interview Question of Selenium Framework.
All the very best…
Cheers..
Shubham !!


Hey Awesome Logical People, Here, I’m waiting for your Selenium interview related queries and feedback. Feel free to comment 🙂
[…] 💡Data Driven Testing is one of the most popular Automation Testing Interview Question for Freshers as well as Experienced folks. If you are interested to learn latest Selenium Interview […]
[…] method, the parameter WindowType is of type Enum . Switching to browser tab / window is a Most Common Selenium Interview Question. Check more interview questions using this link . . […]