Are you in search to write your first selenium program for Google Translate?
Congratulate to yourself !! You are at right place. In these series of Free Selenium Guides, we are discussing all the beginner to advanced level problems – How to Start with Selenium Framework? What softwares and plugins do I need to start? as well as many advanced topics and frequent Selenium Interview Questions-Answers.
And today we will see – How to write code for Selenium to automate translation of some sentences from English to Hindi language? So, without any further delay, let’s directly jump on to our today’s topic – Write your first selenium program for Google Translate tool?
Pre-requisites : In case, if you haven’t done the setup of Selenium framework, Programming language, and IDE in your system, then first check and follow this Selenium guide on How to Start with Selenium Framework and What softwares / plugins do I require.?
I hope, you have done the setup of Selenium in your system. If not, follow the above guide.
I’ll first show you the entire Selenium script with Java programming language and then we will discuss on each of the code statement – Why we have written that code and what does it do?
Solution – First Selenium Program Automation
Here’s the selenium full code snippet to automate the sentence translation using Google Translate –
// Step 0 - Import the required Selenium Framework APIs / Classes -
import org.openqa.selenium.By;
import org.openqa.selenium.WebDriver;
import org.openqa.selenium.WebElement;
import org.openqa.selenium.chrome.ChromeDriver;

// Also include the required Class for Browser Driver Management-
import io.github.bonigarcia.wdm.WebDriverManager;

public class GoogleTranslateTest{

	public static void main(String[] args) throws Exception {

		// PRESETUP steps -
		// Step 1- Download compatible browser driver binary file -
		WebDriverManager.chromedriver().setup();

		// Step 2- Instantiate the desired browser driver object-
		WebDriver driver = new ChromeDriver();

		// Step 3- Delete all cookies-
		driver.manage().deleteAllCookies();

		// Step 4- Maximize window -
		driver.manage().window().maximize();


		// BUSINESS requirement steps -
		// Step 5- Go to WebPage -
		driver.get("https://translate.google.co.in/?sl=en&tl=hi&op=translate");

		// Step 6- Translate the Sentence -
		String sentence = "Learn Selenium with LogicalDuniya.com";

		// Step 7- Find the Input Box to input the Sentence for Translation -
		WebElement inputTextBox = driver.findElement(By.xpath("//textarea[@aria-label='Source text']"));

		// Step 8- Input the Sentence for Translation-
		inputTextBox.clear();
		inputTextBox.sendKeys( sentence );

		// Step 9- Wait for 5 seconds to let the translation happen, then copy translated sentence -
		Thread.sleep( 15000 );
		WebElement resultBox = driver.findElement(By.xpath("//span[@class='HwtZe']"));

		String translatedTextResult = resultBox.getText();
		System.out.println("**** Result = \n"+ translatedTextResult);

		// Step 10- Close and Quit the Browser Driver -
		driver.close();
		driver.quit();

	}
}
Let’s first understand the above Selenium Automation script step-by-step. So, when you’ll execute the above Selenium Script, here is what will happen behind the scene..
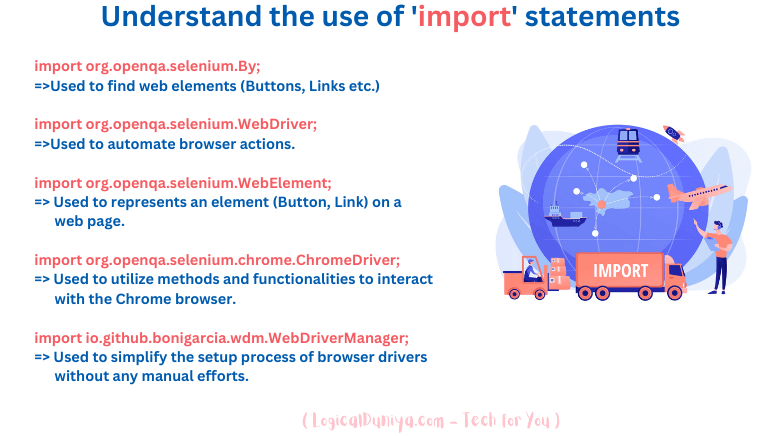
Step 0 : Importing the APIs
First we have imported some of the required APIs and classes from Selenium and WebDriverManager libraries.
import org.openqa.selenium.By;
import org.openqa.selenium.WebDriver;
import org.openqa.selenium.WebElement;
import org.openqa.selenium.chrome.ChromeDriver;

import io.github.bonigarcia.wdm.WebDriverManager;
import org.openqa.selenium.By——————
In Selenium library,Byclass is anabstractclass, using it we identify required buttons to click, links to click, input boxes to input some text into them and so on. This class has variousstaticmethods and we need to call those methods by passing the webpage’s elements information such as – it’s Id, Class name, XPath or whatever we have, to locate those elements and perform actions (Click, Input, etc.) on them.
import org.openqa.selenium.WebDriver——————
In Selenium – Java library,WebDriveris aninterfacein Selenium represents the WebDriver, which is the primary interface for controlling and interacting with a web browser. It provides methods and functionalities to automate browser actions, navigate between web pages, interact with elements, manage cookies, handle alerts, and more.WebDriver driver = new ChromeDriver
In the above full code snippet below to commented Step 2, we have created theChromeDriverobject and assigned it into theWebDriverinterface for further actions
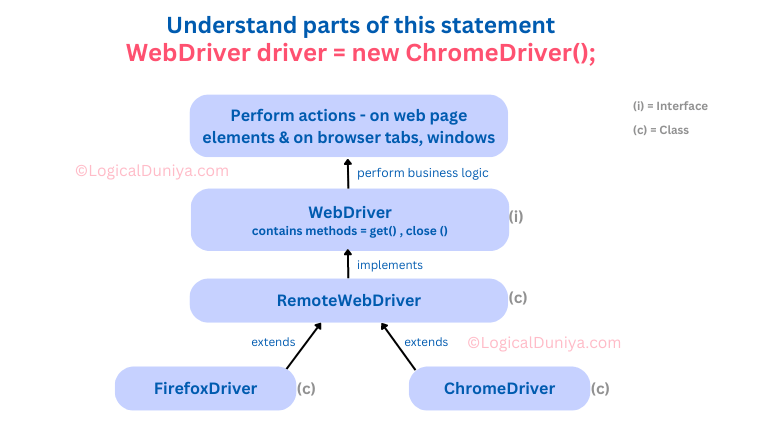
TheWebDriverinterface serves as the foundation for implementing different browser-specific driver classes such asChromeDriver,FirefoxDriver,EdgeDriver, etc. These driver classes extend theWebDriverinterface to provide browser-specific implementations and enable communication between the Selenium client and the real browser.
… … …
… … …
import org.openqa.selenium.WebElement——————
In Selenium – Java library,WebElementis aninterfacein Selenium, which represents an element on a web page. It provides methods to interact with individual elements such as buttons, input fields, checkboxes, dropdowns, and more. WithWebElement, you can perform actions like clicking, sending keys, retrieving text, checking visibility, and manipulating element attributes.WebElement inputTextBox = driver.findElement(By.xpath("//textarea[@aria-label='Source text']"));
In the above full code snippet, theWebElementinterface has been used multiple times, one of use is at Step 7 to find the Input Box to input the sentence for translation.import org.openqa.selenium.chrome.ChromeDriver——————
The import statement forChromeDriver, is an import statement in Java that allows you to access theChromeDriverclass from theorg.openqa.selenium.chromepackage.
TheChromeDriverclass is a browser-specific driver implementation provided by Selenium for automating Google Chrome browser. It extends theRemoteWebDriverclass, which itself implements theWebDriverinterface. TheChromeDriverclass provides the necessary methods and functionalities to interact with the Chrome browser during test automation.
By importing theChromeDriverclass, you can create an instance of it and use it to control and automate Google Chrome for various web testing scenarios. TheChromeDriverclass acts as a bridge between your Selenium code and the Chrome browser, allowing you to perform actions like opening a browser, navigating to URLs, interacting with elements, and more.
import io.github.bonigarcia.wdm.WebDriverManager——————
The lineimport io.github.bonigarcia.wdm.WebDriverManageris an import statement in Java that allows you to access theWebDriverManagerclass.
TheWebDriverManagerclass is a utility provided by the WebDriverManager library. It simplifies the management of browser drivers required for Selenium automation. Instead of manually downloading and configuring the browser driver binaries, theWebDriverManagerclass can automatically handle this process for you.
By usingWebDriverManager, you can dynamically download the appropriate browser driver binary files (such as ChromeDriver, GeckoDriver, etc.) based on the configuration and system requirements. It ensures that you have the correct version of the driver binary compatible with the installed browser on your system.
Above in full code snippet, the lineWebDriverManager.chromedriver().setup();is used to download and configure the ChromeDriver binary file. Thechromedriver()method is invoked on theWebDriverManagerclass to specify that we want to manage theChromeDriver. Thesetup()method then downloads the appropriate driver binary and sets it up for use in the automation script.
By utilizingWebDriverManager, you can simplify the setup process of browser drivers in your Selenium project and ensure compatibility with different browsers without manual intervention.
Step 1 : Pre-Setup of browser specific drivers
After importing all the required APIs from different libraries, I’ve created a class ‘GoogleTranslateTest‘ which will contain the main() method. And, we will write our first selenium program’s business logic inside this function only.
WebDriverManager.chromedriver().setup();The above setup statement has been taken from a Java dependency named ‘WebDriverManager’. If you’ve not heard about it before, then you should know, it helps to solve a frequently coming problem of any Automation Framework.
To tell you as a summary, in every 10-15 days, the browser companies release a new version of their browsers (Chrome / Firefox / Safari etc). So, if the Automation Framework is following the manual management of browser based binary files, then their SDETs / Automation Architect engineers need to update that browser driver binary file as the new version of browser gets live.
So, to solve this manual downloading, setup and maintenance issue, a person whose name is Bonigarcia, has developed a Java based utility library named ‘WebDriverManager‘. This library mainly handles 3 things – download, setup, and maintenance of browser driver binary files required by Selenium WebDriver (e.g., chromedriver, geckodriver, msedgedriver, etc.) in a fully automated manner.
Step 2 : Creating the object for WebDriver
After the above Step 1 of setting up the browser driver binary file, the next step is to creating the object for WebDriver that will help us to interact with the real browser application (Chrome / Firefox / Safari etc).
WebDriver driver = new ChromeDriver();Let’s understand it with some illustration –
Here’s what this line of code does:
ChromeDriveris a class provided by Selenium that implements theWebDriverinterface and represents the Chrome browser driver. It allows you to automate interactions with the Chrome browser.- By instantiating
ChromeDriver(), you create a new instance of theChromeDriverclass, which serves as a communication bridge between your Selenium code and the Chrome browser. - The
newkeyword is used to create a new object of theChromeDriverclass. - The created
ChromeDriverobject is then assigned to theWebDriverinterface variable driver. This allows you to interact with the Chrome browser through the methods provided by the WebDriver interface.
Overall, the line WebDriver driver = new ChromeDriver(); initializes a new ChromeDriver instance and assigns it to the WebDriver interface variable driver. This enables you to control and automate the Chrome browser using the driver object throughout your Selenium automation script.
Step 3 : Deleting all existing cookies
Next step to delete any existing cookies in order to keep the webpage clean and view all of its raw elements. Here the driver object calls it’s method manage() to get the Options interface reference object.
Then, using this Options reference object, we call deleteAllCookies() method to delete any existing cookies.
driver.manage().deleteAllCookies();Step 4 : Maximising the browser window
Before going to Google Translate web app, first we need to maximize the browser window. To do that we have to write below command –
driver.manage().window().maximize();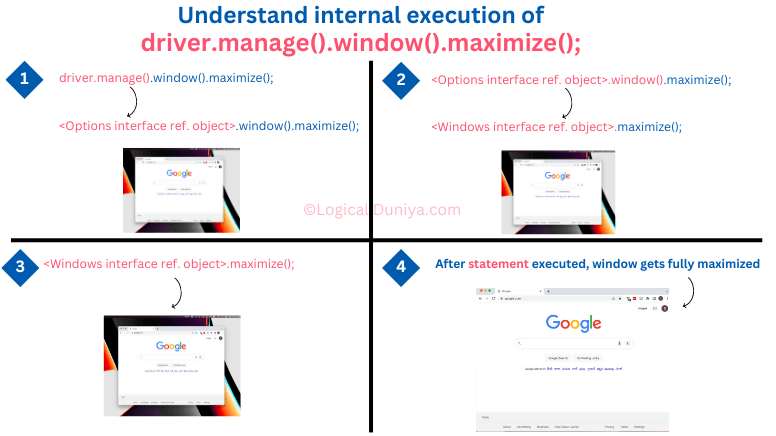
Here, using the driver object,
- First we called
manage()method <-> which internally returnedOptionsinterface reference object. - Using
Optionsinterface ref. object, we calledwindow()method <-> which internally returnsWindowinterface reference object. - Then, finally using the
Windowinterface ref. object, we called themaximize()method, which maximized the currently opened browser window.
Step 5 : Going to Google Translate website
Once our browser window is opened properly, our next step is to launching the URL to open the Google Translate web application. For this we have used driver.get(..) method-
driver.get("https://translate.google.co.in/?sl=en&tl=hi&op=translate");Here, in get() method, we need to pass the URL / Link to the web page. Once this statement gets executed, the browser hits the specified URL / Link and opens the Web page.
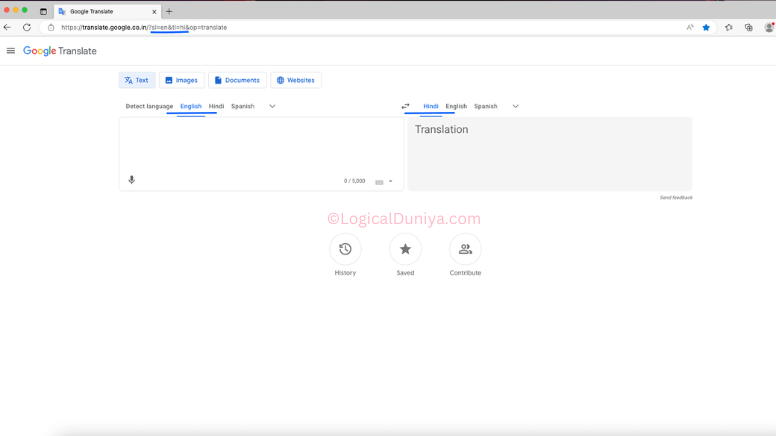
Note : If you have noticed, the languages have already been set. In From section -> English, in To section -> Hindi. Its because, in the URL, we have already passed the same parameters which Google Translate page sends when we select the languages in the Webpage UI manually.
Step 6 : Preparing the sentence to get translated
As the Webpage loaded properly into the browser, our next step is to type the sentence into its source text area section, i.e. ‘English‘. For that, we have create a String variable named ‘sentence‘ and initialized it with text ‘Learn Selenium with LogicalDuniya.com’.
String sentence = "Learn Selenium with LogicalDuniya.com";Step 7 : Entering the text for translation
For translation, we need to input that text into the source text area section ‘English’. For that, we need use locators which can help Selenium Script to locate it. We have used xPath locator to identify that text area web element in the web page –
WebElement inputTextBox = driver.findElement(By.xpath("//textarea[@aria-label='Source text']"));The above Selenium statement will help to locate an input text box on the web page using XPath and assigns it to the inputTextBox variable, which is of type WebElement.
A few important points about XPath –
- XPath is short form of XML Path Language, which is used to uniquely identify or address parts of an XML document.
- As we know, all the webpage are nothing but an XML Document behind the scene / UI.
- An XPath expression can be used to search through an XML document, and get the information from any part of the document, such as an element (such as Input box, Text area) or it’s attribute (such as id, class, and so on) in it.
Here’s a breakdown of what this line of code does:
driver.findElement(By.xpath())is a method call that searches for a web element using an XPath expression. It instructs thedriverobject (which is an instance of theWebDriverinterface) to find a specific element on the web page based on the provided XPath expression.- The XPath expression used here is
//textarea[@aria-label='Source text']. This expression targets atextareaelement that has anaria-labelattribute with the value ‘Source text‘. The double slash (//) at the beginning of the expression indicates that the element can be located anywhere in the HTML document. - The
findElement()method returns a singleWebElementrepresenting the first element that matches the XPath expression. This element is then assigned to theinputTextBoxvariable.

By executing this line of code, we are able to locate the input text box on the web page with the specified XPath expression and store it in the inputTextBox variable. This allows you to perform actions on the element, such as clearing its contents or entering text, using the methods provided by the WebElement interface.
Note : If you want to identify one specific web element on Web page, then it is important that your XPath is showing 1 of 1 for the entered XPath and targeting the right web element. To verify it, just open the ‘Developer tools’ > Then, go to ‘Inspector’ tab > Then press (Control + F -> In Windows, Or, Command + F in Mac) and create / paste your XPath in the search input box.
Step 8 : Entering the sentence
Once the compiler finds the text area WebElement, where it need to input the sentence, the next step is to actually input the text into it. Here’s the code statements for that –
inputTextBox.clear();
inputTextBox.sendKeys( sentence );
The above statements perform actions on the inputTextBox element, which is a WebElement.
Here’s what these lines of code do:
inputTextBox.clear();: This line clears the existing text within theinputTextBox. Theclear()method is aWebElementmethod that removes any existing text or value from an input field.inputTextBox.sendKeys(sentence);: This line sends the value of thesentencevariable to theinputTextBoxelement. ThesendKeys()method is anotherWebElementmethod that simulates typing or entering text into an input field. In this case, the value of thesentencevariable, which is a string, is entered into theinputTextBox.
Together, these lines of code clear the input text box using inputTextBox.clear(); and then enter the value of the sentence variable into the input text box using inputTextBox.sendKeys(sentence);.
Step 9 : Getting Translated Text
The next step is to get the translated text. And, to do that we have written below 2 statements –
Thread.sleep( 15000 );
WebElement resultBox = driver.findElement(By.xpath("//span[@class='HwtZe']"));
Here’s is what we are doing with above 2 statements –
Thread.sleep( 15000 );stops the execution of script for the specified15000mili-seconds (or 15 seconds)- Then, using
driver.findElement(By.xpath(..))methods we have fetched theWebElementcontaining the translated sentence. - We stored the
resultBoxreference variable ofWebElementtype.
String translatedTextResult = resultBox.getText();
System.out.println("**** Result = \n"+ translatedTextResult);
These 2 statements help us Getting the translated text –
- The
getText();method is part ofWebElementinterface, and help us in getting the text visible / stored in the web element. - Once we get the translated text and stored it
translatedTextResultin aStringobject, then we have simply printed the result text using theSystem.out.println()method.
Step 10 : Closing the browser
The lines driver.close(); and driver.quit(); are used to close and quit the browser session respectively.
Here’s what these lines of code do:
driver.close();: This line closes the current browser window or tab that is being controlled by thedriverinstance. It terminates the current browsing session but keeps the underlying WebDriver instance alive. If there are multiple windows or tabs open, only the currently active one will be closed.driver.quit();: This line terminates the WebDriver instance and closes all associated browser windows or tabs. It effectively ends the browser session and releases the resources held by the WebDriver instance. This method is typically called at the end of the test script to ensure that all browser instances are closed and resources are properly released.
It is important to use driver.quit(); at the end of your script to ensure proper cleanup and avoid leaving browser processes running in the background.
Note :
In this example, I was using –
- Selenium WebDriver version – 4.9.1
- Java JDK 8
- Maven – as a build tool
- Eclipse IDE – to run the Selenium Script
- Project type – Maven project
- pom.xml file – this files contents / dependencies are below –
pom.xml –
<project xmlns="http://maven.apache.org/POM/4.0.0"
	xmlns:xsi="http://www.w3.org/2001/XMLSchema-instance"
	xsi:schemaLocation="http://maven.apache.org/POM/4.0.0 https://maven.apache.org/xsd/maven-4.0.0.xsd">
	<modelVersion>4.0.0</modelVersion>
	<groupId>sample</groupId>
	<artifactId>logicalduniya.com</artifactId>
	<version>0.0.1-SNAPSHOT</version>

	<!--
	https://mvnrepository.com/artifact/org.seleniumhq.selenium/selenium-java -->
	<dependencies>
		<dependency>
			<groupId>org.seleniumhq.selenium</groupId>
			<artifactId>selenium-java</artifactId>
			<version>4.9.1</version>
		</dependency>

		<!--
		https://mvnrepository.com/artifact/org.seleniumhq.selenium/selenium-api -->
		<dependency>
			<groupId>org.seleniumhq.selenium</groupId>
			<artifactId>selenium-api</artifactId>
			<version>4.9.1</version>
		</dependency>

		<!-- https://mvnrepository.com/artifact/io.github.bonigarcia/webdrivermanager -->
		<dependency>
		    <groupId>io.github.bonigarcia</groupId>
		    <artifactId>webdrivermanager</artifactId>
		    <version>5.3.3</version>
		</dependency>

	</dependencies>
</project>
Output
Once you will run the program, you will get below results –
Conclusion
So, this is how we can write our First Selenium Program to work with Google Translate tool. We have learnt so many things in this tutorial How to Importing the Selenium APIs, What are their actual usage? Deleting cookies, Maximising browser window, Entering text, Fetching results and Closing the Browser.
This in-depth Selenium tutorial is part of our Free Selenium Framework Mastery Series. In case, if you are also interested to learn about other important topics of Selenium, then check the link of Free Selenium guide.
Let me know in comments section, in which section you have some doubts ? Or, Which other topic you want to learn next ?
Till then, Keep Thinking Logical,
Team LogicalDuniya.com
Cheers, Shubham


Hi Selenium Learners, Feel free to post your doubts and queries here in comments !!
We will try to respond within 24 hours 🙂
[…] Best Selenium Project for Google Translator? A step-by-step guide […]