Do you want to know – How create to Laravel 9 REST API CRUD with Passport Authentication? So with the conventional coherence about Laravel and Passport, we will learn the same thing in this simple Laravel guide.
Today in this tutorial we will learn to build Secure Authentication API using the Laravel Passport package with RESTful CRUD (Create, Read, Update, Delete) API, you need to follow these steps:
To use Laravel Passport and create an API with authentication, you need to ensure that your system meets the following requirements:
Laravel Requirements:
- PHP >= 7.4
- Composer (Dependency Manager for PHP)
- Web Server (e.g., Apache, Nginx)
Laravel Passport Requirements:
- Laravel Framework (>= 6.x)
- Laravel Database Configuration (e.g., MySQL, PostgreSQL, SQLite)
Please note that Laravel Passport is built on top of Laravel, so you need to meet the requirements of Laravel itself.
Additionally, make sure that the required PHP extensions are installed and enabled in your PHP configuration. Laravel and Laravel Passport typically require the following extensions:
OpenSSLPHP ExtensionPDOPHP ExtensionMbstringPHP ExtensionTokenizerPHP ExtensionXMLPHP ExtensionCtypePHP ExtensionJSONPHP Extension
Ensure that these extensions are enabled in your php.ini configuration file.
Step 1: Set up a Laravel Project
First, make sure you have Laravel installed on your system. You can install Laravel using Composer by running the following command:
composer create-project laravel/laravel crud-api-with-authenticationStep 2: Configure Database Connection
In your Laravel project, open the .env file located in the project root directory. Set the database connection details according to your database setup. For example:
DB_CONNECTION=mysql
DB_HOST=127.0.0.1
DB_PORT=3306
DB_DATABASE=your_database_name           // crud-api
DB_USERNAME=your_database_username       // root
DB_PASSWORD=your_database_password       //
Step 3: Set up Passport
In your Laravel project directory, install Laravel Passport using Composer:
composer require laravel/passportAfter installing Passport, run the following commands to set up the necessary tables in your database:
php artisan migrate
php artisan passport:install
The passport:install the command will generate the encryption keys needed for the Passport.
Step 4: Configure Passport
Open the app/providers/AuthServiceProvider.php file and register the registerPolicies() method inside the boot() function, this will expose the required routes.
<?php
namespace App\Providers;
use Illuminate\Foundation\Support\Providers\AuthServiceProvider as ServiceProvider;
use Illuminate\Support\Facades\Gate;
use Laravel\Passport\Passport;

class AuthServiceProvider extends ServiceProvider
{
    /**
     * The policy mappings for the application.
     *
     * @var array
     */
    protected $policies = [
        'App\Models\Model' => 'App\Policies\ModelPolicy',
    ];

    /**
     * Register any authentication / authorization services.
     *
     * @return void
     */
    public function boot()
    {
        $this->registerPolicies();
        Passport::routes();
    }
}
Register the PassportServiceProvider class in the providers array inside the config/app.php file:
'providers' => [
        ...
        Laravel\Passport\PassportServiceProvider::class,
    ],
Next, you need to configure Passport in your Laravel project. Open the config/auth.php file and change the api driver to passport:
'guards' => [
    'web' => [
        'driver' => 'session',
        'provider' => 'users',
    ],

    'api' => [
        'driver' => 'passport',
        'provider' => 'users',
    ],
],
Step 5: Create an AuthController
Create a new controller called AuthController by running the following command:
php artisan make:controller AuthControllerOpen the AuthController file (app/Http/Controllers/AuthController.php) and implement the register, login, and logout methods:
<?php

namespace App\Http\Controllers;

use Illuminate\Http\Request;
use App\Models\User;
use Illuminate\Support\Facades\Auth;
use Illuminate\Support\Facades\Validator;

class AuthController extends Controller
{
    public function register(Request $request)
    {
        $validator = Validator::make($request->all(), [
            'name' => 'required',
            'email' => 'required|email|unique:users',
            'password' => 'required|min:6',
        ]);

        if ($validator->fails()) {
            return response()->json(['error' => $validator->errors()], 400);
        }

        $user = User::create([
            'name' => $request->name,
            'email' => $request->email,
            'password' => bcrypt($request->password),
        ]);

        $token = $user->createToken('MyApp')->accessToken;

        return response()->json(['token' => $token], 200);
    }

    public function login(Request $request)
    {
        $credentials = [
            'email' => $request->email,
            'password' => $request->password,
        ];

        if (Auth::attempt($credentials)) {
            $user = Auth::user();
            $token = $user->createToken('MyApp')->accessToken;
            return response()->json(['token' => $token], 200);
        } else {
            return response()->json(['error' => 'Unauthenticated'], 401);
        }
    }

    public function logout(Request $request)
    {
        $request->user()->token()->revoke();
        return response()->json(['message' => 'Successfully logged out']);
    }
}
Step 6: Create a User Model
If you don’t already have a User model, create one by running the following command:
php artisan make:model UserOpen the User.php file (app/Models/User.php) and add the use Laravel\Passport\HasApiTokens; in User.php file:
<?php

namespace App\Models;

use Illuminate\Contracts\Auth\MustVerifyEmail;
use Illuminate\Database\Eloquent\Factories\HasFactory;
use Illuminate\Foundation\Auth\User as Authenticatable;
use Illuminate\Notifications\Notifiable;
use Laravel\Passport\HasApiTokens;      // This line is newly added

class User extends Authenticatable
{
    use HasApiTokens, HasFactory, Notifiable;

    /**
     * The attributes that are mass assignable.
     *
     * @var array<int, string>
     */
    protected $fillable = [
        'name',
        'email',
        'password',
    ];

    /**
     * The attributes that should be hidden for serialization.
     *
     * @var array<int, string>
     */
    protected $hidden = [
        'password',
        'remember_token',
    ];

    /**
     * The attributes that should be cast.
     *
     * @var array<string, string>
     */
    protected $casts = [
        'email_verified_at' => 'datetime',
        'password' => 'hashed',
    ];
}
Step 7: Create an UserController for CRUD
Create the necessary controller for your CRUD operations. You can create a new controller by running the following command:
php artisan make:controller UserController --apiOpen the UserController file (app/Http/Controllers/UserController.php) and implement the CRUD methods (index, show, store, update, destroy):
<?php

namespace App\Http\Controllers;

use Illuminate\Http\Request;
use App\Models\User;

class UserController extends Controller
{
    // Display a listing of the resource.
    public function index()
    {
        $users = User::all();
        return response()->json(['users' => $users], 200);
    }


    // Display the specified resource.
    public function show($id)
    {
        $user = User::find($id);

        if (!$user) {
            return response()->json(['error' => 'User not found'], 404);
        }

        return response()->json(['user' => $user], 200);
    }

    // Store a newly created resource in storage.
    public function store(Request $request)
    {
        $user = User::create([
            'name' => $request->name,
            'email' => $request->email,
            'password' => bcrypt($request->password),
        ]);

        return response()->json(['user' => $user], 201);
    }

    // Update the specified resource in storage.
    public function update(Request $request, $id)
    {
        $user = User::find($id);

        if (!$user) {
            return response()->json(['error' => 'User not found'], 404);
        }

        $user->update($request->all());

        return response()->json(['user' => $user], 200);
    }

    // Remove the specified resource from storage.
    public function destroy($id)
    {
        $user = User::find($id);

        if (!$user) {
            return response()->json(['error' => 'User not found'], 404);
        }

        $user->delete();

        return response()->json(['message' => 'User deleted'], 200);
    }
}
Step 8: Define Authentication and CRUD Routes
In Laravel, routes are defined in the routes/api.php file. Open the file and add the following routes for authentication and CRUD:
<?php

use Illuminate\Http\Request;
use Illuminate\Support\Facades\Route;
use App\Http\Controllers\AuthController;
use App\Http\Controllers\UserController;

/*
|--------------------------------------------------------------------------
| API Routes
|--------------------------------------------------------------------------
|
| Here is where you can register API routes for your application. These
| routes are loaded by the RouteServiceProvider and all of them will
| be assigned to the "api" middleware group. Make something great!
|
*/

Route::post('register', [AuthController::class, 'register']);
Route::post('login', [AuthController::class, 'login']);

Route::middleware('auth:api')->group(function () {
    Route::post('/logout', [AuthController::class, 'logout']);
    Route::get('/user', function (Request $request) {
        return $request->user();
    });

   // This routes define for CRUD
    Route::apiResource('/users', UserController::class);

   //###################### OR ###########################
    // if you need to define custom crud route then use this.
    // Route::get('/users', [UserController::class, 'index']);
    // Route::get('/users/{id}', [UserController::class, 'show']);
    // Route::post('/users', [UserController::class, 'store']);
    // Route::put('/users', [UserController::class, 'update']);
    // Route::delete('/users/{id}', [UserController::class, 'destroy']);

});
Step 9: Start the server
You can now start the Laravel development server by running the following command:
php artisan serveStep 10: Test Laravel 9 Passport API using Postman
To test a Laravel 9 Passport API using Postman, you can follow these steps:
✤ Install and Open Postman
If you haven’t already, download and install Postman from the official website (Postman). Once installed, open Postman.
✤ Set Request Headers
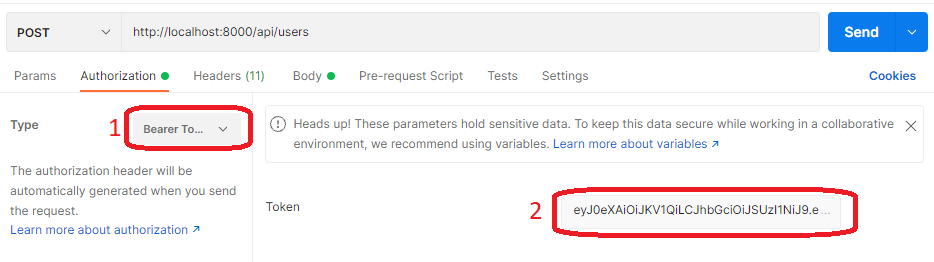
You need to set this access token as a Bearer Token in the Authorization header as listed below:
'headers' => [

    'Accept' => 'application/json',

    'Authorization' => 'Bearer '.$accessToken,

]
Now simply you can run a test of the Laravel Passport API listed URL as in the screenshot:
✤ User Register API: Method: POST
http://localhost:8000/api/register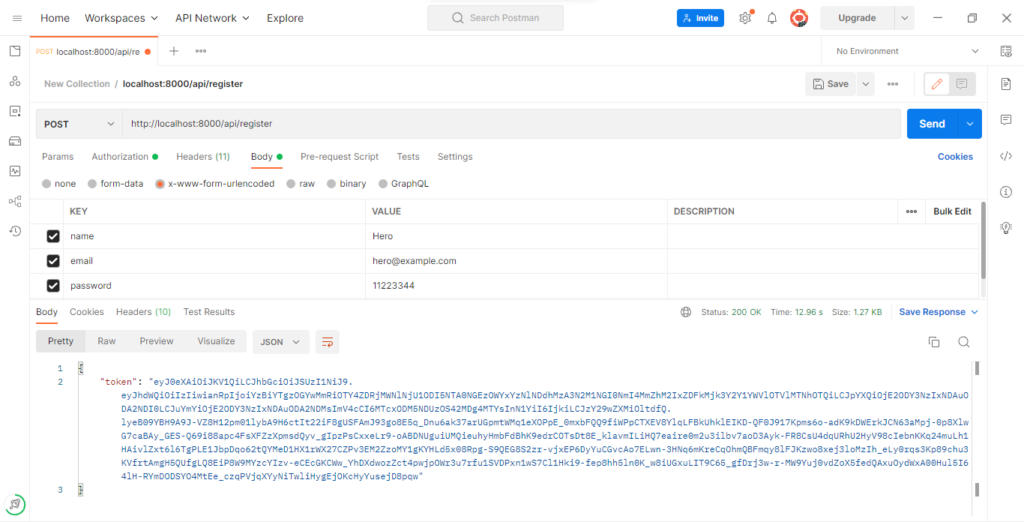
✤ User Login API: Method: POST
http://localhost:8000/api/login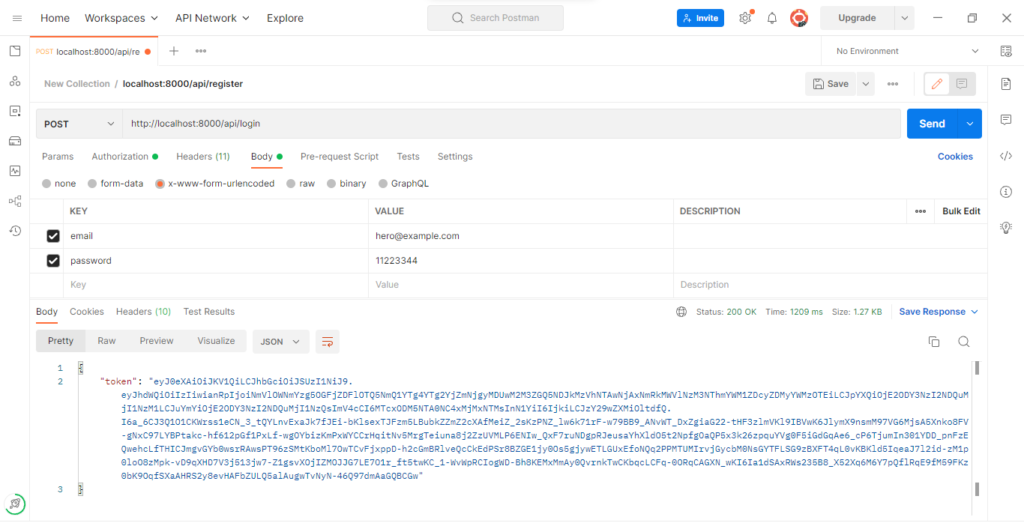
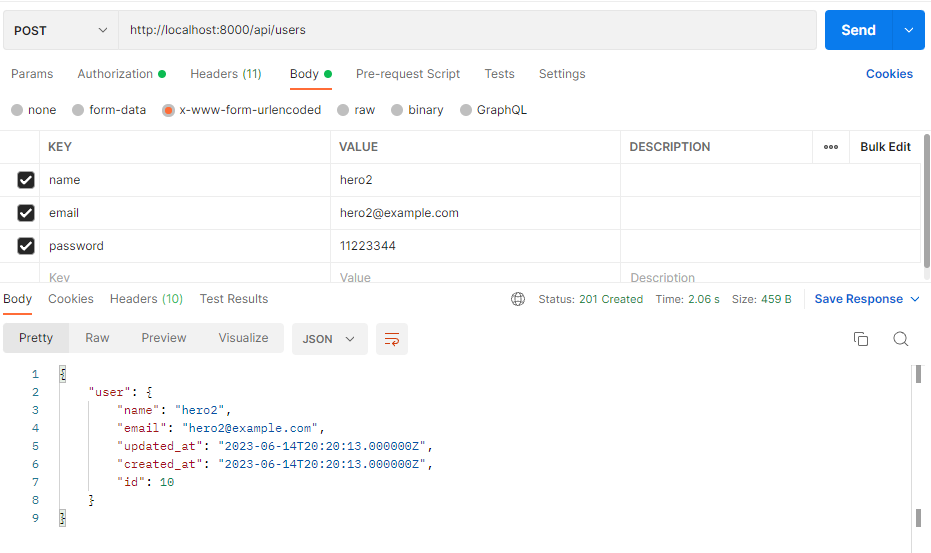
✤ Create User API Method: POST
http://localhost:8000/api/usersAfter registering or login, copy the Bearer Token, and set it in the Authorization Header section in the Postman application as you can see in the screenshot:
✤ Get All User API Method: GET
http://localhost:8000/api/users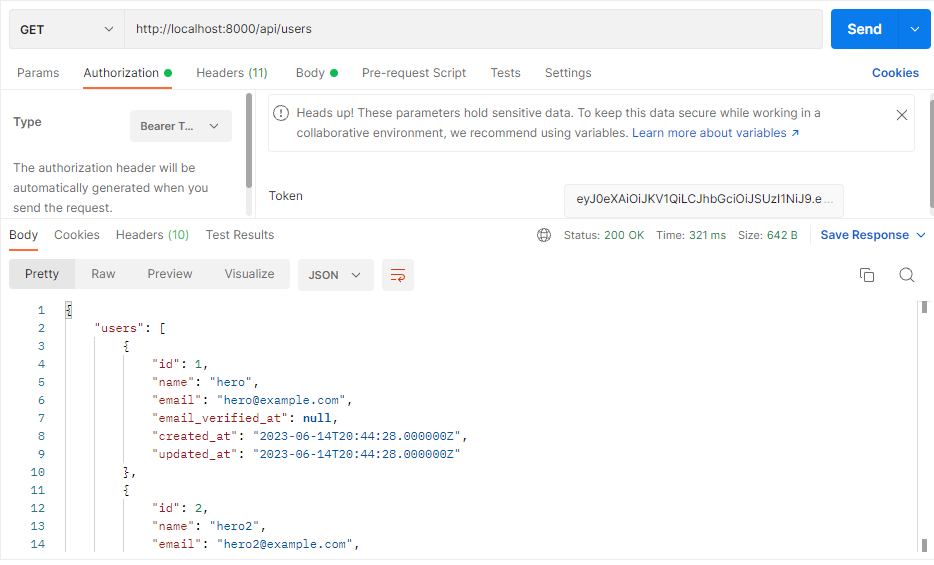
✤ Get Single User API Method: GET
http://localhost:8000/api/users/{id}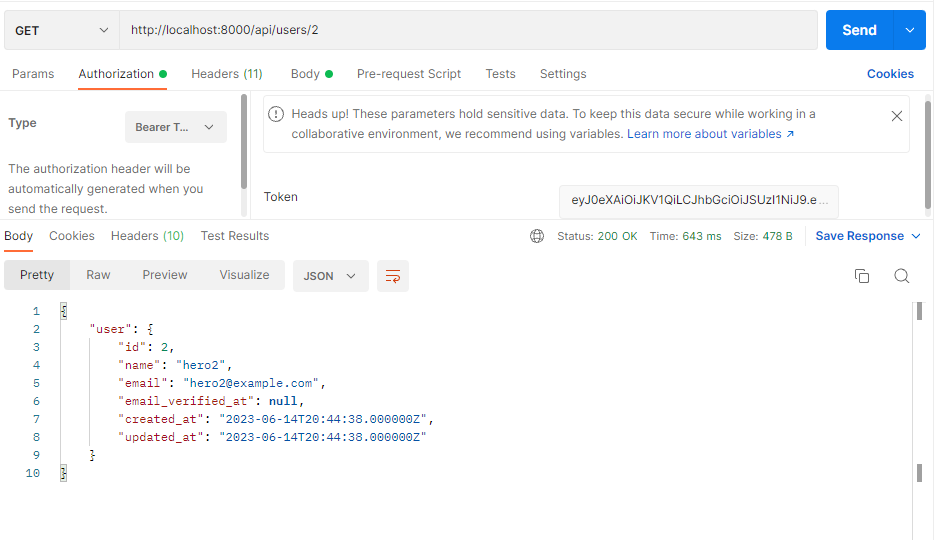
✤ Update User API Method: PUT
http://localhost:8000/api/users/{id}
✤ Delete User API Method: DELETE
http://localhost:8000/api/users/{id}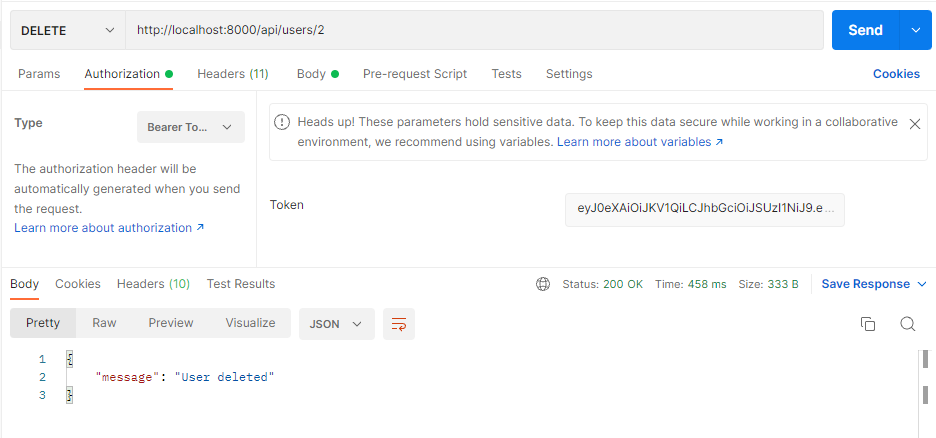
✤ Logout User API Method: POST
http://localhost:8000/api/logout
Conclusion
Finally, we have completed Laravel 9 Passport API Tutorial. In this tutorial, we have covered each and every aspect required to build a secure REST API in Laravel.
We’ve gone through every foundation step and put everything in its place without falling into the trap of procrastination. This tutorial is useful for those who are new and want to try building a secure REST API with Passport in Laravel.
If you need to download the complete code of this tutorial, then you can download it from GitHub.