Do you want to write a working Test Script to Get mouseover text in Selenium WebDriver + Java? If yes, then congratulations.. In this step by step Selenium tutorial, we will learn the same thing – How to get Tooltip Text in Selenium WebDriver ? This tutorial is part of our Selenium Framework Mastery Series, so if you are interested to learn some other interested topics of Selenium Testing Library, then do check it.
In our previous Selenium Interview Question, we have already learnt How to perform mouseover function in Selenium WebDriver using Java?. Now net’s get started with out Selenium get Tooltip text Java and Selenium WebDriver based step by step solution –
Solution First : Get MouseOver Text Using Selenium-Java
package com.logicalduniya.practice.selenium;

import org.openqa.selenium.By;
import org.openqa.selenium.WebDriver;
import org.openqa.selenium.WebElement;
import org.openqa.selenium.chrome.ChromeDriver;
import org.openqa.selenium.chrome.ChromeOptions;
import org.openqa.selenium.interactions.Actions;


/**
    @author Shubham Srivastav
    Description : A simple Test Script to Get MouseOver text using Selenium WebDriver and Java.
*/
class FindMouseoverText {

	private static WebDriver driver;

	public static void main(String[] args) throws Exception {

		setup();

        System.out.println("---- WebDriver Setup is Completed !!");

        mouseOverTooltipTextReadTest();

		System.out.println("---- Mouseover text in Selenium WebDriver+Java Test is completed successfully !!");

	}

	public static void setup() {

		System.setProperty("webdriver.chrome.driver",
			"/Users/logical_duniya_com/Desktop/OtherFiles/ChromeDriver/chromedriver_mac");

		ChromeOptions chromeOptions = new ChromeOptions();
		chromeOptions.addArguments("start-maximized"); 			// open Browser in maximized mode
		chromeOptions.addArguments("disable-infobars"); 		// disabling infobars
		chromeOptions.addArguments("--ignore-certificate-errors");
		chromeOptions.addArguments("--remote-allow-origins=*");
		chromeOptions.setAcceptInsecureCerts(true);				// AcceptInsecureCerts

		driver = new ChromeDriver(chromeOptions);
	}


	public static void mouseOverTooltipTextReadTest() throws Exception {

		driver.get("https://codepen.io/shubh-sri/full/PoxBVvg?src=LogicalDuniya.com");
		driver.switchTo().frame("result");

		 // Locate the image element
        WebElement imageElement = driver.findElement(By.xpath("//div[@class='imgbox']/img"));

        // Perform a mouseover (hover) action on the image
        performMouseover(driver, imageElement);

        // Get the tooltip text
        String tooltipText = getTooltipText(driver);

        // Print the tooltip text
        System.out.println("Tooltip Text is: " + tooltipText);

        // Close the browser
        driver.quit();

	}


	private static void performMouseover(WebDriver driver, WebElement element) {
		Actions actions = new Actions(driver);
		actions.moveToElement(element).perform();
    }

	private static String getTooltipText(WebDriver driver) {
        WebElement tooltipElement = driver.findElement(By.xpath("//div[@class='imgbox']/img"));
        return tooltipElement.getAttribute("title");
    }
}
Output
Console Output :
---- WebDriver Setup is Completed !!
Tooltip Text is: This will be displayed as a tooltip to - LogicalDuniya.com
---- Mouse Over Click Test is Done Successfully !!
Automated Chrome Browser Output :
POM.xml
If you are using maven based Java project, then below pom.xml file will be required. It contains a few of the required dependencies (plugins), from which we have taken / imported some java classes in above test script solution of Getting mouseover text using Selenium + Java.
<project xmlns="http://maven.apache.org/POM/4.0.0"
	xmlns:xsi="http://www.w3.org/2001/XMLSchema-instance"
	xsi:schemaLocation="http://maven.apache.org/POM/4.0.0 https://maven.apache.org/xsd/maven-4.0.0.xsd">
	<modelVersion>4.0.0</modelVersion>
	<groupId>com.logicalduniya</groupId>
	<artifactId>LogicalDuniyaSoftwareTesting</artifactId>
	<version>0.0.1-SNAPSHOT</version>

	<dependencies>
		<!-- https://mvnrepository.com/artifact/org.seleniumhq.selenium/selenium-java -->
		<dependency>
			<groupId>org.seleniumhq.selenium</groupId>
			<artifactId>selenium-java</artifactId>
			<version>4.4.0</version>
		</dependency>


		<!-- https://mvnrepository.com/artifact/io.github.bonigarcia/webdrivermanager -->
		<dependency>
			<groupId>io.github.bonigarcia</groupId>
			<artifactId>webdrivermanager</artifactId>
			<version>5.3.0</version>
		</dependency>

		<dependency>
			<groupId>org.testng</groupId>
			<artifactId>testng</artifactId>
			<version>7.7.0</version>
			<scope>test</scope>
		</dependency>

	</dependencies>

</project>
Explanation-Step by Step
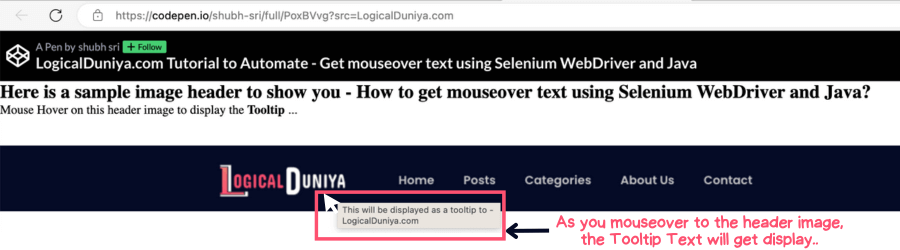
Once you’ll save the above code and run the test class file ‘FindMouseoverText‘, it will launch the Chrome Browser, then it will go to this CodePen’s webpage by LogicalDuniya, and fetch the mouseover text from the header image.
Let’s go through the code snippet step by step and explain how it finds the mouseover text in Selenium WebDriver with Java.
Step 1 – Packaging & Import Statements:
package com.logicalduniya.practice.selenium;

import org.openqa.selenium.By;
import org.openqa.selenium.WebDriver;
import org.openqa.selenium.WebElement;
import org.openqa.selenium.chrome.ChromeDriver;
import org.openqa.selenium.chrome.ChromeOptions;
import org.openqa.selenium.interactions.Actions;
Firstly, we need to tell in which package all our compiled code (.class files) will be kept. That’s why we have written package com.logicalduniya.practice.selenium;
Next, we have written the import statements to import necessary classes and interfaces from the Selenium library as well as Java core libraries. This will allow us to use Selenium methods and classes in the script.
Step 2 – Creating class and main method :
class FindMouseoverText {

	private static WebDriver driver;

	public static void main(String[] args) throws Exception {

		setup();

        System.out.println("---- WebDriver Setup is Completed !!");

        mouseOverTooltipTextReadTest();

		System.out.println("---- Mouseover text in Selenium WebDriver+Java Test is completed successfully !!");

	}
	...
	...
	...
}
After that, we have defined our Test class ‘FindMouseoverText‘ which contains a static variable driver of type WebDriver, and a static method main(..).
Inside this main(..) method, we have called two newly created methods – ‘setup()‘ and ‘mouseOverTooltipTextReadTest()‘, to perform our required task to get mouseover text in Selenium WebDriver + Java.
Step 3 – Setting up the WebDriver – setup() method
Let’s break down the code statements inside our setup() method one by one:
System.setProperty("webdriver.chrome.driver", "/Users/logical_duniya_com/Desktop/OtherFiles/ChromeDriver/chromedriver_mac");:
This line sets the system property “webdriver.chrome.driver” to the location of the ChromeDriver executable. It tells Selenium WebDriver where to find the ChromeDriver executable binary file, so that it can launch the Chrome browser.
ChromeOptions chromeOptions = new ChromeOptions();:
This line creates an instance of the ChromeOptions class. ChromeOptions allows you to customize the behavior of the ChromeDriver and the Chrome browser.
chromeOptions.addArguments("start-maximized");:
This line adds an argument to the ChromeOptions to start the browser in maximized mode. This ensures that the browser window opens in full-screen mode.
chromeOptions.addArguments("disable-infobars");:
This line adds an argument to the ChromeOptions to disable the Chrome infobars. Infobars are informational messages that Chrome displays on top of the browser window, such as “Chrome is being controlled by automated test software.”
chromeOptions.addArguments("--ignore-certificate-errors");:
This line adds an argument to the ChromeOptions to ignore certificate errors. This is useful when dealing with websites that have SSL certificate issues.
chromeOptions.addArguments("--remote-allow-origins=*");:
This line adds an argument to the ChromeOptions to allow remote origins. It enables cross-origin requests from remote domains, which might be useful in certain testing scenarios.
chromeOptions.setAcceptInsecureCerts(true);:
This line sets the AcceptInsecureCerts option to true. It allows the Chrome browser to accept insecure SSL certificates if encountered during navigation. This is helpful when dealing with websites using self-signed certificates or test environments.
driver = new ChromeDriver(chromeOptions);:
This line creates an instance of ChromeDriver with the configured chromeOptions. It initializes the driver variable, which holds the WebDriver object that communicates with the Chrome browser.
Step 4 : Getting Mouseover text using our mouseOverTooltipTextReadTest() method
We created the ‘mouseOverTooltipTextReadTest()‘ method to perform below tasks –
Navigates to the specified URL :
driver.get("https://codepen.io/shubh-sri/full/PoxBVvg?src=LogicalDuniya.com");: <br>This line navigates the WebDriver to the specified URL, which opens a CodePen page containing an image with a tooltip for demonstration.
Switches the WebDriver’s focus to the “result” iframe :
driver.switchTo().frame("result");:
This line switches the WebDriver’s focus to the “result” iframe. The image element is located inside this iframe, so we need to switch to it to interact with the elements inside it.
Locates the image element using XPath :
WebElement imageElement = driver.findElement(By.xpath("//div[@class='imgbox']/img"));: <br>This line locates the image element using an XPath expression. The XPath selects the element inside a element with the class “imgbox”.
Performs a mouseover action on the image :
performMouseover(driver, imageElement);: <br>This line calls the performMouseover() method to perform the mouseover (hover) action on the image element. The performMouseover() method is defined earlier in the code and uses the Actions class to perform the mouseover action.
Retrieves the tooltip text of the image :
String tooltipText = getTooltipText(driver);:
This line calls the getTooltipText() method to retrieve the tooltip text of the image. The getTooltipText() method is also defined earlier in the code and extracts the “title” attribute of the image element, which contains the tooltip text.
Prints the tooltip text to the console :
System.out.println("Tooltip Text is: " + tooltipText);:
This line prints the retrieved tooltip text to the console. It will display “Tooltip Text is: This will be displayed as a tooltip to - LogicalDuniya.com” based on the provided CodePen page.
Closes the browser and ends the WebDriver session :
driver.quit();:
This line closes the browser and ends the WebDriver session. It terminates the execution of the automation script and releases the resources used by the WebDriver.
Main Step : getTooltipText() method execution –
The main statement, to get the mouseover text is present under our this method ‘getTooltipText(..)‘. Let’s understand, what does this method do step-by-step :
private static String getTooltipText(WebDriver driver) {...} :
This statement tells us that, we are defining / creating a method, which is private (only available to this class), which is static (class level, not the object level), which returns String value, whose name is getTooltipText, which takes an object of type WebDriver. The method is designed to retrieve the tooltip text of a specific image element on the webpage.
WebElement tooltipElement = driver.findElement(By.xpath("//div[@class='imgbox']/img"));:
This line locates the tooltip element using an XPath expression. The XPath selects the element inside a element with the class “imgbox.” The driver.findElement(..) method locates the element on the webpage, and the result is stored in the tooltipElement variable, which is of type WebElement.
return tooltipElement.getAttribute("title");:
This line retrieves the “title” attribute of the tooltipElement using the getAttribute("title") method. The “title” attribute contains the tooltip text of the image element. The method returns this tooltip text as a String value and we print it to the console output.
Conclusion
In this Selenium tutorial, we learnt about How can we get the mouseover tooltip text from any WebElement. We have seen step by step each statement and understood – what does each statement do? Hope you have learnt something new today. In our previous Selenium Interview Question, we have already learnt How to perform mouseover function in Selenium WebDriver using Java?.
If you have any question related to this tutorial of Selenium Framework Mastery Series, then post it in comment section. I’ll try to give you answer within 24 hours. Till then, Keep learning with logic..
Cheers,
Shubham.